Simple Dinners 23 / Grilled Peach, Corn and Tomato Panzanella Salad

Grilled Peach, Corn and Tomato Panzanella Salad

I am always looking for recipes that I feel really embody a season. For me it’s a combination of utilising seasonal ingredients when they are at their most delicious, and also a sense of time and place. There’s nothing better than a spiced pumpkin soup on a chilly winter night or a fresh strawberry pie in the springtime.

If I ever write a cookbook, I would love to organise it in seasonal chapters and share my favourite recipes, memories and milestones for each time of year. Summer hasn’t truly started for me until I’m eating a juicy mango over the kitchen sink. I look forward to fig season all year, when my Nanna usually gifts me a big plate of figs from her tree and I make a batch of homemade jam. The first glimpse of blueberries at the market after a long winter. These moments throughout the year are special to me.

Grilled Peach, Corn and Tomato Panzanella Salad

Having access to a fantastic weekly farmers market has really shown me the beauty of seasonal produce. Including the imperfections you’d never see in a supermarket! I absolutely love the Saturday Bondi Market and I go as often as I can. If it’s not in season, you can’t buy it. Simple as that.

There’s no apples coming out of cold storage or grapes imported from halfway around the world. I always feel inspired to cook whenever I come home from the markets with a great haul of produce.

Grilled Peach, Corn and Tomato Panzanella Salad

But back to today’s recipe! This salad just sings out SUMMER. A traditional Tomato Panzanella is Tuscan dish that uses leftover stale bread and fresh tomatoes. My version uses a combination of fresh cherry tomatoes, grilled peaches and corn, and herbs from my garden. Some of my favourite summer ingredients.

I also added a little feta because I thought the creamy, salty cheese would work well here. Since most of the ingredients are sweeter, the savoury note helped to balance the flavours. It’s definitely not a traditional Panaznella ingredient, but I loved the way it tied all together. The dressing is so simple – a little oil and red wine vinegar.

Grilled Peach, Corn and Tomato Panzanella Salad

Grilling the sliced peaches and corn takes it to another level. You can make this recipe on the barbecue or on the stove with a char-grill pan. If it’s a hot day and you don’t want to turn on the oven, you could even crisp the bread in a frypan instead.

Either way, it comes together super easily to make a fantastic quick weeknight dinner for one. Or you could serve this as a side dish with some grilled chicken or salmon. I hope you’ll give this recipe a try before the summer is over!

Related Post: Roasted Vegetable Salad with Quinoa

Grilled Peach, Corn and Tomato Panzanella Salad

Grilled Peach, Corn and Tomato Panzanella Salad

A delicious salad that just screams out SUMMER. This Grilled Peach, Corn and Tomato Panzanella is perfect on its own or as a side dish for grilled chicken or salmon.

Course Dinner, Salad, Side Dish
Keyword Salad, Summer, Vegetarian
Prep Time 10 minutes
Cook Time 20 minutes
Total Time 30 minutes

Ingredients

  • 2 cups crusty bread, roughly torn into pieces
  • 2 tablespoons olive oil
  • 200 g cherry tomatoes, mixed colours if available
  • 2 ripe peaches
  • 1 corn cob, husk removed
  • 1/4 red onion, thinly sliced
  • Basil & mint leaves
  • 2 tbsp feta, crumbled
  • Olive oil and red wine vinegar, for dressing
  • Salt & black pepper to taste

Instructions

  1. Preheat the oven to 200°C (390°F). Drizzle the bread with the olive oil and toss to coat. Toast in the oven for about 10-15 minutes or until crispy.
  2. Roughly chop the cherry tomatoes into halves or quarters depending on their size and place into your salad bowl.
  3. Slice the peach into eighths and brush with a little bit of olive oil. Place slices onto a BBQ grill or char-grill pan and cook for about 3-5 minutes on each side until char marks appear.
  4. Brush the corn cob with a little olive oil and grill for 10-15 minutes, turning frequently until slightly coloured on all sides. Carefully remove the corn from the cob with a knife.
  5. To assemble the salad, layer the toasted bread with grilled peaches, corn and tomatoes in a large salad bowl. Add the red onion, herbs and feta. Dress with olive oil, red wine vinegar, salt and pepper to taste and toss to combine. Serve immediately as a main meal or a side dish.

My Favourite Zucchini Pickles

My Favourite Homemade Zucchini Pickles

I have been making my own pickles for a couple of years now, but I’ve never shared my go to recipe! Homemade pickles are a game-changer for me. My favourite pickles (that I keep coming back to over and over) are based on the famous Zuni Cafe Zucchini Pickles via Gourmet Traveller magazine.

I was intrigued that the recipe used zucchinis instead of cucumbers, but I was an immediate convert. I love them on burgers, toasties and sandwiches, or even thrown into a salad for a sour-sweet kick. They are also delicious on a cheeseboard. I’ve even used the leftover brine to flavour my slow cooked meats!

I love browsing the jars of artisan pickles in the gourmet food shops, but they can be upwards of $15 sometimes! The zucchinis cost about $3 – they are in season right now, abundant and cheap! All the other ingredients were already in my pantry.

But it’s not just about saving money. I love the satisfaction of making things from scratch. But you definitely don’t need to live on a farm or grow your own vegetables to preserve things. I’m a busy girl living in a major city, and I truly think everyone should learn to do this!

You can make jams (sweet or savoury), pickles, shrubs, sauces and more with your leftover produce that completely transform the ingredients and extend their life. I am really excited about bringing you more recipes and ideas like this in 2019. 

One of my goals this year is to also be way more mindful of waste, both in terms of food waste and excess plastic. I want to start buying all of my staples – grains, nuts, pasta, spices – from a bulk foods store to avoid packaging, and store them in glass jars in my pantry. I have a collection of jars ready to be reused for storage or homemade jams and pickles.

My Favourite Homemade Zucchini Pickles

I love to shop at the Bondi Farmers Market… with a reusable shopping bag, of course! Another option is the ‘Imperfect Picks’ at Harris Farm. It is fantastic that we have the option to buy fruits and vegetables that would otherwise go to landfill. And they are cheaper too!

I think preserving is a fantastic way to help reduce food waste and excess packaging in your own kitchen. It’s a great way to use up fruit and veggies that may be on their last legs in your crisper. All that is to say that I truly encourage you to try making your own pickles!

My Favourite Homemade Zucchini Pickles

This recipe has a couple of steps, but it’s actually very easy. Don’t skip soaking the zucchini in ice cold water, and allowing the brine to cool. These steps help keep that fresh crunch of the zucchini. No one wants a limp pickle! You can enjoy these straight away, but they are even better after a couple of days in the fridge.

Related Post: Homemade Tomato & Chilli Jam (use both for the ultimate burger!)

My Favourite Homemade Zucchini Pickles

My Favourite Zucchini Pickles

This is my absolute favourite homemade pickle recipe, adapted from Zuni Cafe in San Francisco. These Zucchini Pickles are perfect on burgers, sandwiches, salads or cheeseboards and the perfect introduction to preserving at home. If possible, begin this recipe 2 days ahead. 

Course Pickles
Keyword Pickles
Prep Time 2 hours
Cook Time 5 minutes
Total Time 2 hours 5 minutes
Servings 3 cups

Ingredients

  • 500 g zucchini
  • 1 small onion
  • 2 tablespoon fine sea salt
  • 2 cups apple cider vinegar
  • 1/2 cup caster sugar
  • 2 teaspoons mustard powder
  • 2 teaspoons mustard seeds
  • 1 teaspoon ground turmeric

Instructions

  1. Use a mandolin or sharp knife to thinly slice the zucchini and onion. 

  2. Place zucchini and onion with salt in a large bowl and add ice water to cover. Stir to dissolve the salt and stand for at least 1 hour or until zucchini slices are tender.

  3. In the meantime, combine the vinegar, sugar, mustard powder and seeds and turmeric in a saucepan. Stir to dissolve and simmer over medium heat for a few minutes. Cool to room temperature.
  4. Sterilise your jars by washing them in hot soapy water, rinse and then place in a 120°C (250°F) oven until completely dry. 

  5. Drain zucchini and onion and pat dry with paper towel. Divide zucchini between the jars and add the brine, ensuring all zucchini is covered. 

  6. Seal and refrigerate for 2 days to pickle. Pickles will keep refrigerated for at least 3 weeks.

Best Recipes of 2018

Papaya Boats with Grain Free Granola

I hope you all had a wonderful Christmas with lots of great food, family and friends. I just wanted to pop in here one last time before the end of the year and share a little recap of the recipes I have loved the most this year. 2018 was a wild ride. This year I dealt with a period of burn out, which threw me for a loop. I felt my creativity tap turned off and felt a lot of stress and anxiety.

Cooking was something that really helped during this time. I even read an article about the rise of anxiety baking last week – so I’m glad I’m not alone! PS, it’s a great article, give it a read. Baking (especially anything that involves kneading dough) has always been a way that I relax and unwind. I really want to take this rediscovered passion into 2019 and share a lot more content here. I published 17 recipes this year, and I loved them all, but these 8 (+1 bonus recipe) below were my very favourites.

Papaya Boats with Grain Free Granola

1. Papaya Fruit Boats with Grain Free Granola

You know how much I love to make homemade granola, but this recipe took it to the next level. I really loved this textured nut and seed based ‘grain free’ granola as one of the toppings on a papaya boat, along with coconut yoghurt and a lot of fresh fruit. Seriously, this was a really delicious and healthy brunch that I would love to eat every day.

Berry and Rose Wagon Wheel Slice

2. Berry and Rose Wagon Wheel Slice

This recipe just had to make my Best of 2018 list. I loved every single layer seperately – the coconutty base, the raspberry and chia jam, the vanilla and rosewater marshmallow and the chocolate topping. But when you took a bite and tried them all together the result was sublime. A delicious and nostalgic treat.

Blueberry Acai Smoothie & Chia Parfait

3. Blueberry Acai Smoothie & Chia Parfait

While the Papaya Boats are a little more extravagant, this recipe looks a little more like the breakfast I would eat on a day to day basis. I will usually have a smoothie OR a chia pudding, but this time I decided to combine them together and the result was absolutely delicious.

Pork Meatball Banh Mi Salad Bowl

4. Pork Meatball Vietnamese Salad Bowls

I eat a salad most days, but they are usually not as pretty as this one! This Vietnamese inspired salad has been one of my absolute favourite recipes this year. It’s the perfect balance of flavours and textures. I even made my own carrot and daikon pickles, which really transformed this salad into something special. 2018 was also the year I discovered that I love radishes.

Earl Grey Chocolate Chip Cookies

5. Earl Grey Chocolate Chip Cookies

I would say this was the most crowd pleasing recipe of the year! Making this recipe was pure comfort baking for me, exactly what I needed when I was dealing with a lot of anxiety. The ground French Earl Grey tea was such a beautiful addition. I made a big batch of these cookies and ended up giving most of them away to friends, who absolutely loved them.

Blueberry Crumble Cake

6. Blueberry Crumble Cake

I made this cake for the first time back in 2010, but it is one of my favourite afternoon tea or picnic cakes. I decided to republish it this year, as the original pictures made me cringe a little and my photography skills have come a long way since then! I’ve made many versions of this cake over the years using different fruit for the filling, and I know I’ll continue to make it for a long time to come.

Roasted Strawberry Paloma

7. Roasted Strawberry Paloma

This drink was a surprise, because I thought I didn’t really like grapefruit or tequila but I loved them together with roasted strawberries in this Paloma! It was a super refreshing cocktail that I can’t wait to experiment with more over this summer. I am already imagining other delicious flavour combinations, but this was definitely a winner.

Fig Crumble Tart with Honey Whipped Ricotta

8. Fig Crumble Tart with Honey Whipped Ricotta

This Fig Galette was another recipe that came from my archives that I was compelled to update and re-photograph and I was so pleased with how this version came out. Baked fruit desserts have always been my favourite, especially when I can showcase seasonal ingredients.

Spicy Pork and Tahini Noodles

9. BONUS Spicy Pork and Tahini Noodles

Okay okay, this recipe was not published this year, but it is seriously one of my favourite dishes. My housemate taught me this recipe, and we seriously make it at least once a month. It is such a delicious and easy dinner that is packed with flavour. I hope you’ll give it a try in 2019!

Pearl Barley, Pomegranate and Fennel Salad – Christmas Side Dish!

Pearl Barley, Pomegranate and Fennel Salad - Christmas Side Dish

Just a quick little post from me today with a last minute Christmas side dish that I’ve been obsessed with for the last couple of weeks. I’ve already made this colourful Pearl Barley, Pomegranate and Fennel Salad twice and it’s not even Christmas yet! 

I can’t lie, the main reason I love this dish is because it looks so pretty and colourful. I eat salads almost every day, and they aren’t always the most exciting to look at. When I am entertaining friends and family, I really try to make salads and side dishes that have a lot of interesting colour and texture. This has even converted some friends to eating ingredients they thought they didn’t like, because they were used in a new, interesting way.

I think it would be the perfect side dish for any Christmas feast – and look great on the table too! This salad looks so pretty and festive with pomegranate, radish and plenty of fresh herbs on top. I served this alongside roast lamb, but it would also work well with ham, pork or turkey.

It is also a vegan recipe, so you could even serve it with a whole roasted cauliflower or a stuffed roasted pumpkin if you are making a plant based holiday lunch this year.  

Pearl Barley, Pomegranate and Fennel Salad - Christmas Side Dish

Pearl Barley is part of the ‘ancient grains’ family, but for some reason it wasn’t really on my radar until recently. We had a packet in the pantry for ages but I had never thought to cook with it. I was flicking through an old magazine and saw a salad that inspired this one. Pearl Barley is a fantastic, affordable grain that you can use in dishes like soup, porridge, risotto and of course, salads. It is high in fibre, B-vitamins, iron, zinc and can also be a source of protein.

And now there is no turning back. I can definitely see myself making variations of this all year round – with charred corn and tomatoes in the summer and with roasted pumpkin and crumbled fetta in the winter.

I love the slightly chewy texture of the pearl barley against the crunchy fresh fennel, pomegranate and roasted almonds. The dressing is perfectly balanced with mustard, lemon juice and apple cider vinegar.

I also just wanted to wish you all a very Merry Christmas! I hope you enjoy the holiday with good food, family and friends. I will see you next week with a roundup of my favourite posts of the year. And of course, there will be many more delicious recipes in 2019!

Pearl Barley, Pomegranate and Fennel Salad - Christmas Side Dish

Pearl Barley, Pomegranate and Fennel Salad

This is a delicious, colourful and healthy salad that would be the perfect Christmas side dish for any kind of roasted meat or seafood. It’s also vegan so everyone can enjoy it!

Course Salad, Side Dish
Keyword Christmas, Healthy Recipes, Salad, Simple Dinners
Prep Time 20 minutes
Cook Time 30 minutes
Total Time 50 minutes
Servings 8 people

Ingredients

  • 1 1/2 cups pearl barley
  • 1 small fennel (or half larger one)
  • 4-5 radishes
  • 3 small spring onions, sliced
  • 1 small pomegranate, arils removed
  • Fresh mint and parsley, roughly chopped
  • 100 g roasted almonds

Mustard dressing

  • 1/3 cup olive oil
  • 2 teaspoons Dijon mustard
  • 1 lemon, juiced
  • 1-2 tablespoons apple cider vinegar (or white wine vinegar)
  • Salt & Pepper

Instructions

  1. Place pearl barley into a medium saucepan and cover with cold water. Bring to the boil and then reduce the heat to medium. Simmer for about 30 minutes, stirring occasionally until the barley is tender. Drain and transfer to a large bowl to cool to room temperature.
  2. Meanwhile, make the dressing. Whisk all ingredients together in a small bowl or jug and season to taste.
  3. Slice the fennel and radishes as finely as possible with a knife or mandolin.
  4. To assemble the salad, add the sliced fennel and radishes, spring onions, pomegranate, almonds and herbs to the cooled pearl barley. Toss to combine, add the dressing and toss again. Transfer to a serving dish or platter.

No Churn Christmas Pudding Bombe Alaska

Cake. Ice cream. Torched Meringue. These three things are a match made in heaven.

When reading up on the history of the Bombe Alaska, I had visions of it being invented in the kitchen of a super fancy hotel while it was snowing outside. Rich and glamorous guests would marvel over this brand new dessert after enjoying a 6 course banquet dinner. But it turns out that it was probably invented in New Orleans! It was then made popular in New York in 1867 under the name ‘Alaska Florida’ due to the contrast of hot and cold elements in the dessert.

I really like this slightly less traditional version of the Christmas pudding. Here in Australia, Christmas falls during the summer, so the last thing you feel like eating is a piece of steaming hot pudding. We are much more likely to grab a piece of watermelon and then jump in the pool! 

No Churn Christmas Pudding Bombe Alaska

Back in 2009, I made a huge 4 litre batch of Christmas pudding ice cream for our big family gathering. Everybody raved about it for years to come, it was a big hit. So I thought it was definitely time to bring it back –  but fancier – and the Christmas Pudding Bombe Alaska was born.

I made this Bombe Alaska for a little pre-Christmas catchup with my family and everybody loved it. This time, I altered the ice cream recipe so it would be No Churn. If you’ve been reading at all lately, you know how much I love this super simple no churn ice cream recipe. The base recipe is basically two ingredients – condensed milk and thickened cream, and then you can add any flavour you like. It is so much easier than dealing with egg yolks, custards and ice cream machines.

No Churn Christmas Pudding Bombe Alaska

I also made my own Christmas pudding from scratch – don’t worry, it’s a really easy recipe! But if you’re short on time, feel free to skip this and just get a good quality store-bought one. It is used for the cake base and also gets crumbled into the ice cream, so get one that you love the taste of.

Many versions of Bombe Alaska call for it to be browned quickly in a searing hot oven or a cheeky flambé – douse it in liquor and set it alight! I was too scared to put my beautiful homemade ice cream into the oven. Most modern recipes recommend using a blowtorch, where you can quickly and lightly direct the flame over the meringue to brown it. This worked perfectly for me. I’d definitely recommend investing in a small kitchen blowtorch.

No Churn Christmas Pudding Bombe Alaska

While this recipe may look a little complicated, please don’t be intimidated. It was very easy to put together. I made the ice cream and the pudding the day before, and assembled it right before serving. The most stressful part was taking pictures of it and hoping it wouldn’t melt!

And if you aren’t a fan of Christmas pudding, feel free to change up the flavours of the ice cream and cake. A candy cane ice cream with a chocolate cake base would be fantastic. Or experiment with a gingerbread or rocky road version. They are just as festive and would be absolutely delicious!

Related Post: Berry & Moscato Trifles

No Churn Christmas Pudding Bombe Alaska

No Churn Christmas Pudding Bombe Alaska

A pudding perfect for an Australian Christmas – No Churn Christmas Pudding Bombe Alaska. A delicious combination of ice cream, cake and meringue!

Course Dessert
Keyword Christmas, Dessert, Ice Cream
Prep Time 40 minutes
Cook Time 40 minutes
Freezing Time 8 hours
Total Time 1 hour 20 minutes
Servings 8 people

Ingredients

Easy Christmas Pudding (adapted from Donna Hay)

  • 1 cup sultanas
  • 1 cup dried cranberries
  • 2/3 cup rum or scotch (or black tea if you prefer not to use alcohol)
  • 1 teaspoon mixed spice
  • 2 teaspoons vanilla extract
  • 125 g butter, softened
  • 1 cup brown sugar
  • 2 eggs
  • 1 1/4 cups plain flour
  • 1/4 teaspoon baking soda (bicarb)
  • 1/2 cup almond meal

No Churn Christmas Pudding Ice Cream

  • 1/2 cup sultanas
  • 1/2 cup dried cranberries
  • 2 tablespoons rum or scotch (or black tea if you prefer not to use alcohol)
  • 3/4 teaspoon mixed spice
  • 1 teaspoon vanilla extract
  • 400 ml can sweetened condensed milk
  • 600 ml thickened cream
  • 1/4 cup chopped pistachios, optional

Meringue

  • 4 egg whites
  • 185 g caster sugar
  • Pinch cream of tartar, optional
  • Raspberries, to serve

Instructions

To make the Easy Christmas Pudding…

  1. Place the sultanas and cranberries into a bowl with the booze (or tea if you prefer not to use booze). Stir in the mixed spice and vanilla extract. Set aside to infuse for at least 1 hour.
  2. Preheat the oven to 150°C (300°F). Line a 22 cm cake tin with non-stick baking paper.

  3. Place the butter and sugar in the bowl of an electric mixer and beat for 8-10 minutes or until light and creamy. Add the eggs, one at a time, beating after each addition.
  4. Sift the flour, baking soda and almond meal over the fruit mixture and stir well, ensuring all the fruit is coated in flour. Add the butter mixture and stir to combine well. Spoon into the cake tins. Bake for 40 minutes or until cooked when tested with a skewer. Allow to cool in the tin for 10 minutes.
  5. Trim the large cake to the size of the pudding basin and roughly crumble up the offcuts. Set aside to use in the ice cream. Wrap the trimmed cake in plastic wrap or place into an airtight container and set aside overnight.

To make the No Churn Christmas Pudding Ice Cream…

  1. Place the sultanas and cranberries into a bowl with the booze (or tea if you prefer not to use booze). Set aside to infuse for at least 1 hour.
  2. Line a 1 litre pudding basin with 2 layers of cling wrap.
  3. In another bowl, whisk together the mixed spice, vanilla and condensed milk. In a seperate large bowl, whip the cream until soft peaks form. Fold 1/4 of the cream into the condensed milk mixture with a spatula until combined, and then add this mixture back into the bowl with whipped cream.
  4. Gently fold all together until fully incorporated. Add the infused fruit, the pistachios if using, and crumbled Christmas pudding and fold into the ice cream mixture. Pour into the pudding basin, cover the top with the overhanging cling wrap and freeze overnight.

To make the meringue

  1. Use an electric beater to beat egg whites in a large bowl until firm peaks form. Add the caster sugar, 1 tablespoon at a time, beating until thick and glossy.

To assemble the Bombe Alaska

  1. Place cake onto a large plate. Invert ice cream mixture directly on top of the cake and remove the plastic wrap. Working quickly, spread the meringue over the ice cream to cover it completely. Lightly blowtorch the meringue to brown. Serve immediately with fresh raspberries.

Recipe Notes

You will need to begin this recipe the day before you want to serve it.

Gingerbread Spiced Fig Granola

Gingerbread Spice and Fig Granola

I’ve been making homemade granola since 2008, and it has changed my breakfast game forever. After my very first batch, I had an inkling that chopping almonds and stirring warmed honey through rolled oats would become a part of my regular routine. Here we are ten years later, I can’t even remember the last time I purchased cereal or granola at the supermarket! Granola is still one of my favourite things both to cook, and to eat for breakfast. Plus, it always makes my kitchen smell amazing. 

One of the reasons I love making things from scratch is having total control over the ingredients going in. There are absolutely no preservatives or nasties in sight. It can also be adapted for any allergies or nutritional requirements. I get almost all of the ingredients from the bulk section of my local supermarket. This not only helps to keep the cost of ingredients down, but also reduces plastic packaging waste. 

I also think that Homemade Granola would make a wonderful edible Christmas present. This version is inspired by the flavours of gingerbread and I just love how it came out. The combination of spices and the addition of golden syrup give it a lovely warm, festive flavour. The dried figs and cranberries add a little sweetness and are a lovely textural contrast.

I’ve been enjoying it for breakfast this week with almond milk and raspberries. It would also be delicious with any kind of yoghurt (coconut yoghurt is definitely my favourite). Or it would make a lovely crunchy topping for a smoothie bowl. And if you’re feeling a little extra, some chopped white or dark chocolate stirred through would be delicious too.

Gingerbread Spice and Fig Granola

This recipe is so fantastic for tinkering with – it’s very forgiving and you can’t really go wrong. Use your favourite nuts and seeds, or whatever you have on hand. I’ve loved including raw buckwheat in my last few batches – it goes super crunchy in the oven. But if you can’t find it, feel free add an equal amount of something else that you love instead.

If you were giving this homemade granola as a gift, you could make it according to the recipe below and package in a jar or cellophane bag. Or you could even turn it into a DIY project. Add the dry ingredients like oats, nuts, seeds, coconut and spices layered into a jar. Keep the dried fruit separate, packed into another little jar or cello bag. Include a handwritten note giving instructions to stir in the warmed wet ingredients, bake and add the dried fruit when cool. Very thoughtful and cute!

Related Post: Papaya Boats with Grain Free Granola

Gingerbread Spiced Fig Granola

A delicious festive version of Homemade Granola with warm spices, figs and cranberries. It also makes a perfect homemade Christmas gift!

Course Breakfast
Keyword Breakfast, Christmas
Prep Time 20 minutes
Cook Time 30 minutes
Total Time 50 minutes

Ingredients

  • 3 cups rolled oats
  • 1/2 cup sunflower seeds
  • 1/2 cup pepitas
  • 1/2 cup raw buckwheat (buckinis)
  • 1/2 cup coconut flakes
  • 2/3 cup raw hazelnuts
  • 1 cup raw almonds
  • 2 teaspoons cinnamon
  • 4 teaspoons ground ginger
  • 1/4 teaspoon nutmeg
  • 1/2 cup honey (or rice malt syrup)
  • 1/2 cup golden syrup
  • 1/2 cup olive oil
  • 1 teaspoon vanilla extract
  • 8 dried figs, roughly chopped
  • 3/4 cup dried cranberries or raisins (whatever you prefer)
  • Yoghurt or almond milk and your favourite fruits, to serve

Instructions

  1. Preheat the oven to 180°C (350°F) and line a large baking tray (or 2 small ones) with non-stick baking paper.
  2. Place the oats, sunflower seeds, pepitas, buckwheat, coconut, hazelnuts, almonds, cinnamon, ginger and nutmeg into a large bowl and stir to combine.
  3. Place the honey, golden syrup, olive oil and vanilla into a small saucepan, and heat on a medium heat on the stove until just before boiling.
  4. Pour the liquid ingredients over the dry ingredients and mix well to coat completely. Transfer the mixture to the prepared baking trays and spread evenly.
  5. Bake for around 25 minutes, making sure to turn the tray and give it a stir at about the halfway mark to ensure the granola is cooked evenly.
  6. When nice and golden, remove from the oven and set aside to cool for 10 minutes, then stir well to break up the clusters. When cool, stir in the chopped figs and cranberries and store in an air-tight container.

Candy Cane and Gingerbread Cheesecake Stuffed Cookies

Christmas Candy Cane Gingerbread Cheesecake Stuffed Cookies
Welcome to December! Christmas season is definitely in full swing now. I am not one of those people who gets super extra around Christmas time (I am yet to set up my tiny little Christmas tree) but I do really love making festive recipes.

In the past, I have left Christmas baking to the last minute, but this year I am hoping to share quite a few delicious recipes with you! I’m feeling excited and inspired… and you know how much I love an edible homemade gift!

Christmas Candy Cane Gingerbread Cheesecake Stuffed Cookies
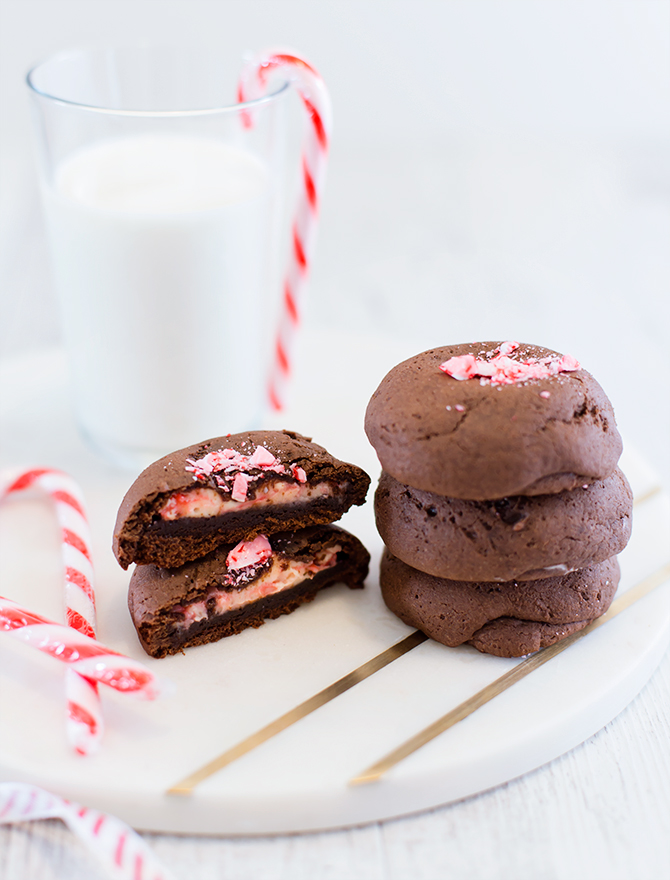
And now onto the cookies! Believe me when I say these cookies are crowd pleasers. The original Cookies & Cream Cheesecake Stuffed Cookies have fans on at least three continents, and have sort of become my signature. They say you can’t buy happiness, but you can buy ingredients to make these cookies, and that’s pretty darn close.

These two versions are a small adaptation to make them feel festive and Christmassy. They are absolutely perfect for sharing with friends or giving as gifts. One has a candy cane cheesecake centre, because who doesn’t love the combination of peppermint and chocolate?!

Christmas Candy Cane Gingerbread Cheesecake Stuffed Cookies
For the other variation, I used crushed Pfeffernüsse (German gingerbread holiday cookies) and ginger for a lovely warm spiced filling. You can find these at Aldi around this time of year, or maybe try making your own? I would be hard pressed to pick a favourite because I really love them both. You could of course get creative with the filling too – maybe a fruit mince cheesecake? Or a salted caramel or red velvet version would be nice too.

The best thing about this recipe is that it’s super easy. You don’t need a mixer or a rolling pin, or piping bags or any other special equipment, and take less than 15 minutes to bake! They also seem to stay fresh and soft for quite a long time, so you can make them in advance. The only trick is to chill the dough and cheesecake filling for a while so they are easier to work with, especially because here in the southern hemisphere, our Christmas falls over summer.

Christmas Candy Cane Gingerbread Cheesecake Stuffed Cookies
I absolutely love homemade edible gifts. I think they are a really nice way to show your friends and family that you care and have taken the time to create something, put it in a cellophane bag and tie it with a ribbon. There are so many options that would suit any skillset, so you don’t need to be a Master Chef. It’s also a fantastic thing to get kids involved in doing, especially over the holidays.

Related Post: Chocolate Spice Gingerbread

Christmas Candy Cane Gingerbread Cheesecake Stuffed Cookies

Candy Cane and Gingerbread Cheesecake Stuffed Cookies

A delicious Christmas version of my famous crowd-pleasing Cheesecake Stuffed Cookie recipe, made with candy canes and Pfeffernüsse (German gingerbread cookies).

Course Cookies
Keyword Christmas, Cookies
Prep Time 45 minutes
Cook Time 15 minutes
Total Time 1 hour
Servings 12 cookies

Ingredients

Cheesecake Filling

  • 125 g cream cheese, at room temperature
  • 2 tablespoons caster sugar
  • 1 teaspoon vanilla extract
  • 4 candy canes, crushed, plus extra to sprinkle on top
  • 4-6 Pfeffernüsse cookies, crushed
  • 1/2 teaspoon ground ginger

Cookies

  • 1/2 cup (110g) butter
  • 1 1/2 cups (350g) light brown sugar
  • 2 eggs
  • 1/2 cup (55g) cocoa powder
  • 1/4 tsp salt
  • 3/4 tsp baking powder
  • 2 cups (260g) all-purpose flour
  • Fleur de sel, to sprinkle

Instructions

  1. To make the cheesecake filling, mix the cream cheese, caster sugar and vanilla together until well combined.
  2. Divide the mixture in half, into separate bowls. Gently mix the crushed candy canes into one bowl. Gently mix the crushed Pfeffernüsse and ground ginger into the other bowl.

  3. Place in the fridge for at least 30 minutes. Take tablespoons of the chilled filling and shape into 6 x 3cm round patties for each flavour, about 1cm thick. Place back into the fridge until ready to use.

  4. Line two baking tray with non-stick baking paper. Preheat your oven to 180°C (350°F). 

  5. In a medium saucepan, melt the butter. Take off the heat and stir in the brown sugar and eggs. Then add the cocoa, salt and baking powder and stir until well combined. Add the flour and stir until no floury patches are left. Place the mixture into the fridge for 30 minutes to firm slightly and make shaping the cookies easier.

  6. Take 1 heaped tablespoon of dough and flatten into a 5cm circle on the baking tray. They should be just larger than your cheesecake pattie. Place the cheesecake disc on top.

  7. Top with a flattened tablespoon of dough, and seal the edges. Repeat until you have twelve cookies. Sprinkle the tops of the Ginger cookies with fleur de sel and bake for 8-12 minutes. When baked and still warm, sprinkle the top of the Candy Cane cookies with a little crushed candy cane.

Blueberry Crumble Cake

Blueberry Crumble Cake
Today’s recipe is one that I have loved for years – Blueberry Crumble Cake. I first made it on the blog in 2010 and have baked it several more times over the years. But looking at the really old photo made me cringe a little, and I wanted to update it and share here it again. Or maybe I just wanted an excuse to eat cake.

In the original post, I talked about the things I loved to cook the most – from slow cooked meats simmered for hours to make a rich ragu to seasonal fruit desserts. In that respect not much has changed in 8 years. I’ve made both in the last week alone!

Blueberry Crumble Cake
I still get excited when the seasons change and I see the first peaches or cherries, figs or pears at the markets. I feel inspired about the dishes I can create with them in the limited time they are around each year.

And of course, I still love this crumble cake recipe because it is super versatile. It’s the perfect vehicle for whatever fruit you have on hand – fresh or frozen, or maybe even a little overripe.

Blueberry Crumble Cake
I’ve made this crumble cake many times, changing up the fruit in the filling to things like raspberries, sliced peaches or rhubarb. There are so many options for delicious variations. It always turns out great and your kitchen smells incredible as it is baking – bonus!

The cake itself is super simple – a few pantry staples come together to form a lovely soft cake. I feel like you can get away with experimenting with spices and flavourings in the cake. Spices like ginger and cardamom to fresh lemon zest to finely ground tea (like these cookies) or a splash of bourbon. I love having recipes that I can adapt to any mood or the ingredients I have on hand.

Blueberry Crumble Cake
This time I kept it simple with a little cinnamon and a handful of pecans chopped and scattered through the crumble. Perfect for springtime – a little bit cozy, but summery too.

The combination of buttery cake, juicy jam-like baked fruit and crunchy crumble topping just can’t be beat. It’s an easy to make, homely dessert. A lovely alternative to an afternoon tea cake, or even just to snack on.

This cake has accompanied me to many picnics because it’s easy to transport and definitely a crowd pleaser.

Blueberry Crumble Cake
Serve just as it is – warm or room temperature, with a generous dusting of icing sugar. Or take it to the next level with a big scoop of ice cream or a dollop of double cream and some fresh blueberries on the side. Of course, I’d recommend the latter.

Related Post: Healthy Berry, Coconut & Quinoa Crumble

Blueberry Crumble Cake

Blueberry Crumble Cake

A delicious Blueberry Crumble Cake, that is perfect for afternoon tea and picnics. Adapt the versatile recipe to use your favourite seasonal fruits!

Course Cake, Dessert
Keyword Cakes, Spring, Summer
Prep Time 20 minutes
Cook Time 40 minutes
Total Time 1 hour
Servings 9

Ingredients

  • ¾ cup sugar
  • 55 g butter softened
  • 1 egg
  • 2 teaspoons vanilla extract
  • ¼ cup milk
  • ¼ cup pouring cream
  • 1 ½ cups plain flour
  • 1 teaspoons baking powder
  • ½ teaspoon salt
  • 1 1/2 teaspoons ground cinnamon
  • 2 cups fresh or frozen blueberries

Crumble

  • ¼ cup sugar
  • ¼ cup brown sugar
  • 1/3 cup plain flour
  • 1 teaspoon ground cinnamon
  • 55 g butter softened
  • 1/3 cup pecans, chopped

Instructions

  1. Preheat the oven to 180°C (350°F). Grease a 20 x 20cm (8 x 8 inch) pan. Cream together the sugar, butter, egg and vanilla extract.
  2. Combine flour, baking powder, salt and cinnamon in a medium bowl. In another bowl or jug, combine milk and cream. Add flour mixture to the butter in thirds, alternating with milk, starting and ending with flour. Pour batter into the pan. Top with blueberries.

  3. To make the crumble topping, combine the sugar, brown sugar, flour, cinnamon and butter. Rub butter into the mixture with your fingertips, and then add the pecans and combine. Sprinkle over cake batter. 

  4. Bake for 30-40 minutes until crumble is golden brown and a skewer inserted into the cake comes out clean. Cool in the baking tin for 10 minutes before cutting into slices.

Simple Dinners 22 / Pork Meatball Banh Mi Salad Bowls

Pork Meatball Banh Mi Salad Bowl
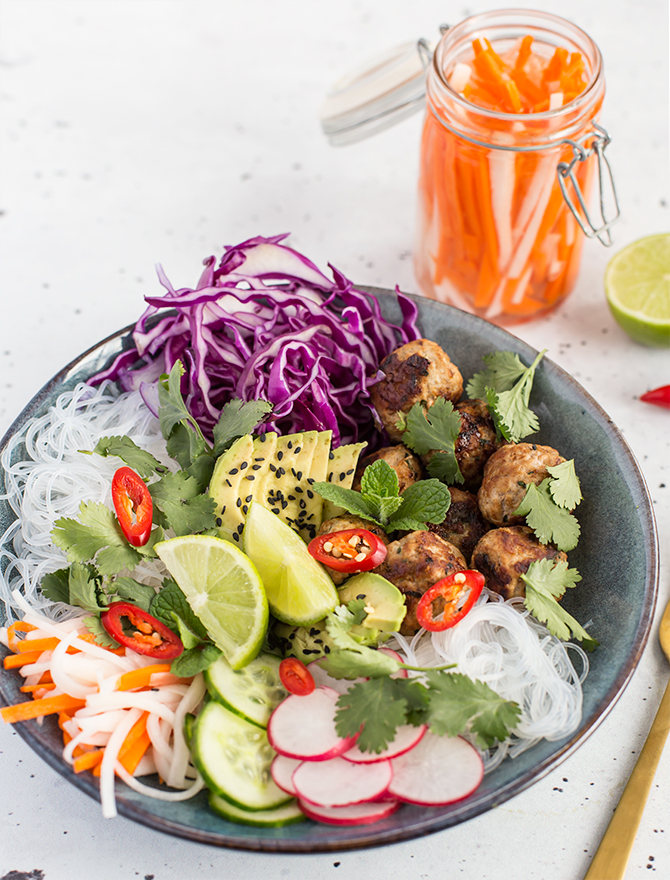
They say you eat with your eyes first, and this colourful Pork Meatball Banh Mi Salad Bowl just lights up my soul. Just look at those colours! It’s zero exaggeration to say I would happily eat it over and over every day and not get tired of it.

I’ve always loved salads like this with lots of colour and crunch, but prior to #bowlsofinstagram I didn’t care what they looked like. It may sound weird, but these days I actually love spending a few extra minutes making my salads and smoothie bowls look pretty, even if I’m not taking a photo of it for the ‘Gram or sharing it with anyone else. I’ve found a great pleasure in putting together a pretty, colourful meal just for me.


View this post on Instagram


Quick Vietnamese Pickles are so delicious and easy to make.

A post shared by Lisa (@spicyicecream) on

I grew up in an area of Sydney with a large Vietnamese population, and it has long been one of my favourite cuisines. I remember the scent of coriander on the bus as the girl in front of me ate her pork banh mi. As a kid, ham and cheese sandwiches were usually made on fresh Vietnamese rolls from the local bakery. I crave pho as comfort food just as much as I crave Mum’s spaghetti bolognese.

Last year I travelled to Vietnam for the first time, after it had been on my bucket list for years! The food in Saigon was hands down the highlight. I love the fresh, vibrant flavours of this cuisine, the crazy energy of the markets and the care and pride that goes into every dish. I wanted to capture some of that in this salad. It’s not necessarily traditional, but it is very delicious.

Pork Meatball Banh Mi Salad Bowl
This dish consists of pork meatballs with plenty of fresh ginger and coriander, homemade daikon and carrot pickle, vermicelli noodles and my spin on satay sauce using almond butter. The salad is a rainbow of colour with red cabbage, radish, cucumber, avocado and chilli. It’s topped with loads of fresh herbs and chilli.

There’s a lot going on in this bowl, but the flavours are wonderfully balanced with freshness, acidity from the pickles and heat from the chilli. With so many different textural elements, it is really a joy to eat and no two bites are the same.

Pork Meatball Banh Mi Salad Bowl
Of course, as with most of my recipes, feel free to take this and make it your own. Perhaps replace the meatballs with grilled chicken, salmon or prawns. Try grilled marinated tempeh or grilled firm tofu (and omit fish sauce) for a vegan Banh Mi Salad. I’m not vegan, but I think that would be freakin delicious. Add a scattering of roasted peanuts or fried shallots on top for extra crunch. Or change up the dressing from my ‘Satay-ish’ sauce to a more traditional Nuoc Cham.

But whatever you do, please give the pickles a try! They could not be more simple, especially if you have a julienne tool. They really take the dish up to the next level. If you’re anything like me, you will want to eat this salad over and over, making it a perfect Simple Dinner.

Related Post: Spicy Pork and Tahini Noodles

Pork Meatball Banh Mi Salad Bowl

Pork Meatball Banh Mi Salad Bowl

Pork Meatball Bahn Mi Salad Bowl is a delicious and colourful simple dinner inspired by the classic Vietnamese sandwich. The homemade pickles are simple to make and take this dish to another level. 

Course Main Course
Keyword Healthy Recipes, Pickles, Simple Dinners
Prep Time 30 minutes
Cook Time 15 minutes
Total Time 45 minutes
Servings 4

Ingredients

Banh Mi Pickles

  • 1 daikon white radish
  • 2 carrots
  • 1 cup water
  • 1/4 cup sugar
  • 1 tablespoon salt
  • 1/2 cup rice wine vinegar

Pork Meatballs

  • 500 g pork mince, free range if possible
  • 1 tablespoon ginger, finely grated on a microplane
  • 1 clove garlic, minced
  • 1 teaspoon soy sauce or tamari
  • Coriander, chopped
  • Salt & pepper

Satay-ish Sauce

  • 2-3 heaped tablespoons almond butter (or tahini or peanut butter if you prefer)
  • Juice of 1 lime
  • 1 tablespoon soy sauce
  • 1 teaspoon fish sauce
  • Chilli, finely chopped, optional
  • Hot water

Build your Bowl

  • 1 packet vermicelli noodles
  • Red cabbage
  • 2 Avocadoes
  • 1 Cucumber
  • 4 Radishes
  • Bahn Mi Pickles (recipe above)
  • Lime
  • Chilli
  • Fresh herbs of your choice (I used mint and coriander)
  • Black sesame seeds, optional

Instructions

  1. To make the Bahn Mi Pickles, sterilise 1-2 jars depending on their size. I do this by filling my kitchen sink with boiling water and submerging the jars and lids for 5 minutes and then drying them in a low oven for about 10-15 minutes, or until they are completely dry. You can also use your dishwasher on its highest setting.
  2. Peel and cut up the daikon and carrots julienne (thin strips like matchsticks). Combine the water, sugar, salt and rice wine vinegar and stir to combine until the sugar and salt have dissolved. Pack the vegetable matchsticks as vertically as possible into your jars, and top up with the pickling liquid. Seal the jars and set aside in the fridge for at least 30 minutes before using, but they are best after a day. Store in the fridge for up to 1 week.
  3. To make the meatballs, place the ingredients into a bowl and combine with your hands. Wet your hands and roll into balls. Cook in batches if necessary, in a medium frypan over medium heat until browned and cooked through.
  4. To make the satay-ish sauce, stir together the almond butter, lime juice soy sauce, fish sauce and chilli if using. Add 1 tablespoon of hot water at a time until it reaches your desired consistency.
  5. To assemble your bowls, finely chop your vegetables (red cabbage, cucumber, radishes, chilli etc) and herbs. Halve the avocados, thinly slice the flesh and carefully scoop out with a large spoon. Prepare the noodles according to packet instructions - mine said to soak in boiling water for 5 minutes and then drain.
  6. Place the chopped vegetables, avocado, vermicelli noodles, your homemade pickles and the cooked meatballs into serving bowls. Scatter with herbs, chilli, black sesame seeds and lime wedges for garnish. Serve the sauce on the side or drizzle over the top.
  7. If you’re making this for a dinner party, you could have all the ingredients prepped in the centre of the table and each person can build their own bowl.

Blueberry Acai Smoothie & Chia Parfait

Blueberry Acai Smoothie & Chia Parfait
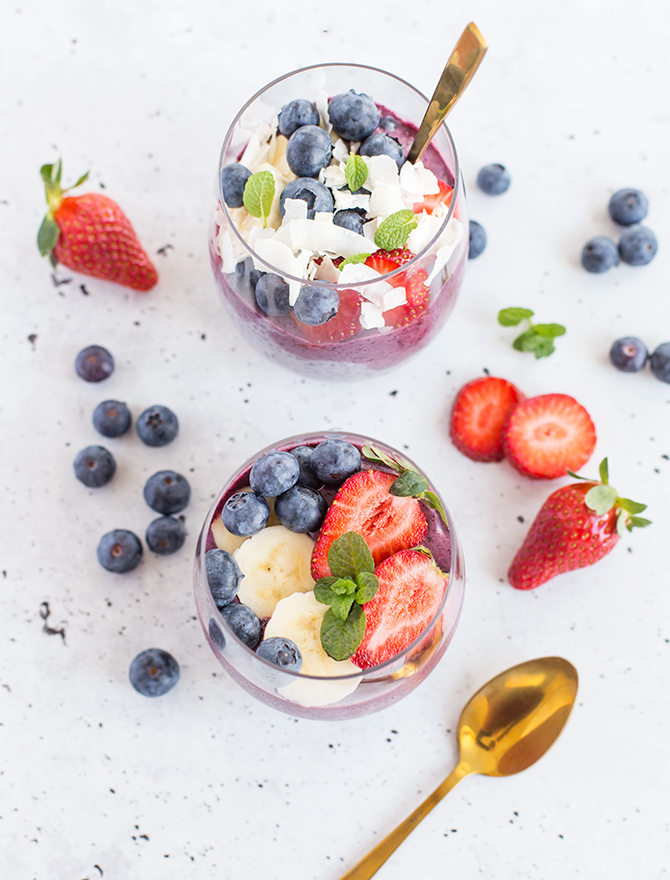
Happy Tuesday! Today I am bringing you a nice simple recipe for a healthy breakfast that I have been absolutely loving lately. Why choose between Chia Pudding and an Acai Bowl when you can combine them together! And so the Blueberry Acai Chia Smoothie Parfait was born. The name is a bit of a mouthful – or should I say a spoonful – and it’s totally delicious.

I first shared this on my Instagram stories a few weeks ago, but I’ve made it quite a few times since then. I think this will be a favourite during the summer months, so I wanted to share it here on the blog too.

I love starting my day with a smoothie, and I’ve shared a few of my favourites here on the blog before. It’s a great way to pack in some vitamins first thing in the morning. I definitely notice an improvement in my energy levels when I have them for breakfast. This green smoothie is my favourite when mangoes are in season. Although I must say, there’s a much wider selection of frozen fruit available now, which are just perfect for throwing into smoothies and mean you can add your favourite fruit all year round.

Blueberry Acai Smoothie & Chia Parfait
This smoothie parfait feels a little more festive and it definitely kept me feeling more satisfied for longer. I put this down to the added chia pudding, which has protein, fibre and omega-3 fats. They also contain calcium, which is great as this recipe is completely vegan and has no dairy.

Acai is another ‘superfood’ that has definitely hit the mainstream in the last few years. Colourful and Insta-worthy acai bowls and smoothies are on the menu of cafes everywhere in Sydney. You can buy frozen acai puree or in powder form, which makes it very easy to have at home.

Blueberry Acai Smoothie & Chia Parfait
It’s deep purple in colour, thanks to a plant compound called anthocyanin which has antioxidant effects. Other foods like blueberries, black beans, pomegranates, grapes (even wine!) and cherries are also high in this beneficial compound. But instead of getting caught up in unproven health claims of particular foods, I think eating as many colourful fruits and vegetables as possible is the best and most delicious way to maximise your daily intake of vitamins and minerals.

The chia pudding is best when it’s prepped in advance, so this makes life way easier in the morning. Your breakfast prep is already half done! I find it most convenient to always have frozen bananas and blueberries on hand because I use them in many of my smoothies.

Blueberry Acai Smoothie & Chia Parfait
You can top off your Chia Smoothie Parfait with any fruit you like – extra fresh banana or blueberries, passionfruit, kiwi fruit and strawberries. I also like to change up the crunchy topping day to day, from homemade granola to cacao nibs or buckinis or coconut. You can add a drizzle of nut butter or honey if the mood strikes. Or add some edible flowers if you want to snap an Instagram photo 😉  It’s really up to you to make it your own and adapt it to your taste.

It makes me extremely happy to dip in my spoon and taste a little bit of everything, combined with the different textures of my chosen toppings each day. It’s a great breakfast that you could even pack into jars or containers and take on the go.

Related Post: Blueberry Chia Jam and Coconut Chia Pudding

Blueberry Acai Smoothie & Chia Parfait

Blueberry Acai Smoothie & Chia Parfait

A delicious and healthy breakfast that combines two of my favourite things - an Acai Bowl and Chia Pudding. Perfect for prepping in advance and taking on the go.

Course Breakfast
Keyword Breakfast, Healthy Recipes
Prep Time 15 minutes
Servings 2

Ingredients

Chia Pudding

  • 1 cup coconut & almond milk (or your favourite plant milk)
  • 1 tablespoons chia seeds
  • 1 tablespoon rice malt syrup
  • 1 teaspoon vanilla extract
  • 2 tablespoons acai powder

Blueberry Acai Smoothie

  • 1 cup frozen blueberries
  • 1 frozen banana
  • 1 tablespoon protein powder of your choice (optional)
  • 1 tablespoon almond butter
  • 1 tablespoon acai powder
  • 1 cup coconut & almond milk (or your favourite plant milk)

Toppings (your choice)

  • Strawberries
  • Blueberries
  • Banana
  • Granola
  • Buckinis
  • Coconut
  • Kiwi Fruit
  • Edible Flowers

Instructions

  1. To make the chia pudding, in a bowl or jar, mix together the coconut & almond milk, chia seeds, rice malt syrup and vanilla extract. Set aside for 15 minutes, stir again and refrigerated for a few hours or overnight. When pudding has thickened, stir in the acai powder.
  2. To make the smoothie, combine the frozen blueberries, banana, protein powder (if using), almond butter, acai powder and coconut & almond milk in your NutriBullet or high-powered blender. Blend well until fully combined.
  3. To assemble the parfait, layer the chia pudding in glasses or jars and spoon the blueberry acai smoothie over the top. Top with your favourite fruit and toppings such as berries, kiwi fruit, papaya, buckinis, granola, coconut, edible flowers etc.
  4. I used fresh blueberries, sliced banana, strawberries, coconut flakes and fresh mint leaves for mine.