Bill Granger’s Coconut Bread

Bill Granger Coconut Bread

One of my little projects this year is going back through fifteen years of blog archives and updating some of my very favourite recipes. I started my blog as a graphic design college student back in 2007. I was just getting into baking, blogging and photography and never imagined that I would still be doing all these things so many years later! Today’s recipe is Bill Granger’s Coconut Bread, which I first made in 2008 and which is still on his cafe menus all around the world. 

Bill is Sydney’s King of Breakfast, winning us over with fluffy ricotta pancakes and even fluffier scrambled eggs. Apparently he even created avocado toast, which is a staple on almost every cafe menu in the country. Trust me, I have designed hundreds of menus!

Bill Granger Coconut Bread

Granger’s latest book Australian Food embraces the multicultural melting pot that Australia is now. While the book is beautiful, it would have been great to see some recipes incorporating native ingredients. Think wattleseed, finger lime, lemon myrtle alongside the recipes containing harissa, umeboshi and kimchi. I know I’m oversimplifying this issue, but I hope that in the very near future, true “Australian” food can be a mix of both our wonderful and unique native ingredients AND the rich food history of all cultures who call Australia home today. 

This Coconut Bread originally had Sri Lankan origins. This loaf is a nice alternate for the classic banana bread. But it’s arguably even easier to whip up because you don’t need to wait for your bananas to be at the perfect level of ripeness. All the ingredients are things you likely have in your kitchen right now! It’s not *quite* a one-bowl recipe (maybe a bowl + a jug) but it comes together easily with minimal washing up.

Bill Granger Coconut Bread

It makes a truly great weekend breakfast. Or, you can make it ahead of time! It lasts well in a container for several days and it can also be frozen in slices. I love it simply toasted with lots of butter, but you could get extra fancy as I have here. I whipped some creamy ricotta with maple syrup and vanilla to a smooth consistency. It is delicious slathered it onto the toasted coconut bread. I also loved it topped with mango and berries for ~summer vibes~ but use whatever fruit you love! Fresh peaches, sliced banana, blueberries or caramelised pineapple would also be delish.

I made a few small tweaks to the original recipe, using shredded coconut rather than desiccated. The texture is just wonderful. I also added some coconut extract to really pump up the flavour and reduced the amount of cinnamon. You could also try substituting coconut milk for the regular milk. If I test this, I’ll update the recipe below!

Bill Granger Coconut Bread

I tested this Coconut Bread twice while preparing this blog post. The first time I made it exactly as I had on the original blog post. The texture was a bit more dense, like a pound cake. I made it a second time, increasing the baking powder and adding a little self-raising flour. It rose up high and beautiful with a lighter, more crumbly texture. I preferred the second loaf, whereas my sister loved the first one. I’ll leave instructions in the notes underneath this recipe so you can tailor it to your own personal preference!

If you make this Coconut Bread recipe, please let me know here in the comments or over on Instagram. Please take a pic and tag me @spicyicecream. I absolutely love to see your photos of the recipes you’ve made!

Related Post: Blueberry Loaf Cake with Lemon and Thyme Glaze

Bill Granger Coconut Bread

Bill Granger’s Coconut Bread

This Coconut Bread comes from Bill Granger's famous cafes. It's a great alternate for classic banana bread – but even easier because you probably have all the ingredients in your pantry right now!

Course Breakfast, Brunch
Keyword Australian, Bread & Yeast, Breakfast, Brunch
Prep Time 20 minutes
Cook Time 1 hour
Total Time 1 hour 20 minutes
Servings 1 loaf

Ingredients

  • 300 ml milk
  • 2 eggs
  • 1 teaspoon coconut extract
  • 1 teaspoon vanilla bean paste or extract
  • 300 g (2 cups) plain flour
  • 75 g (1/2 cup) self raising flour
  • 3 teaspoons baking powder
  • 225 g caster sugar
  • 1 teaspoon ground cinnamon
  • 75 g (2/3 cup) shredded coconut
  • 75 g melted butter

To serve

  • 1 1/2 cups creamy ricotta
  • 3 tablespoons maple syrup, or to taste
  • 1 teaspoon vanilla bean paste
  • 1 mango, cut into chunks
  • Fresh raspberries
  • Extra shredded coconut
  • Extra maple syrup

Instructions

  1. Grease the sides and line the base of a 21x10cm loaf tin. Preheat your oven to 180°C (350°F).
  2. Whisk together the eggs, milk, vanilla and coconut extract in a small bowl or jug.
  3. Sift together the plain and self-raising flour, baking powder, sugar and cinnamon in a bowl. Stir in the shredded coconut. Make a well in the centre and pour in the egg mixture until just combined, being careful not to overmix.
  4. Pour into the prepared loaf tin and bake for 1 hour or until a skewer inserted into the centre comes out clean. Cool in the tin for 5 minutes and then turn onto a wire rack. Cool completely before slicing.
  5. To serve, place the ricotta, maple and vanilla in the bowl of a food processor and pulse until totally smooth. Toast slices of the coconut bread and top with whipped ricotta, mango, raspberries and shredded coconut. Top with maple syrup and serve. This coconut bread is also delicious toasted with salted butter and a dusting of icing sugar.

Recipe Notes

To make a more dense hearty loaf, use 2 1/2 cups (375g) plain flour instead of substituting the self raising flour and 2 tablespoons baking powder.

Eggplant Pasta (Pasta alla Norma)

Eggplant Pasta

Today I’m sharing one of my favourite ever pasta recipes. You know that feeling, when you know you’re eating your favourite food for dinner, and you look forward to it all day? That’s how I feel about this recipe. We call it Eggplant Pasta, but its also widely known as Pasta alla Norma. From the small amount of research I did, I know it has Sicilian origins, but it seems like there are many different ways to make this classic vegetarian pasta dish.

I’m really trying to get better at sharing my very favourite recipes. The ones that don’t seem all that special or glamorous, but make the best quick, simple dinners. Perfect for weeknights and busy days. This is one of those. I’ve made this dish so many times that the process and ingredient quantities are now completely intuitive. I can do this on autopilot when I’m wiped after a full day shoot. I had to force myself to write it down this time so I could share it with you here! 

Eggplant Pasta

Eggplant is by far one of my favourite vegetables. I love that it beautifully takes on the flavours of whatever accompanies it. I pretty much love it in all ways, forms, shapes and sizes. It’s an ingredient used so many ways by so many different cultures, from Japanese miso eggplant (Nasu Dengaku) to Filipino eggplant omelette (tortang talong) to smokey baba ganoush and moussaka. I love it all. But my sister is the total opposite, disliking eggplant in all forms except this recipe. That must say something – that even an eggplant hater loves this dish!

How to make Eggplant Pasta

This dish is easy, forgiving and hard to mess up! It’s perfect for beginner cooks or if you just want to try something new, but simple on a weeknight. Also, if you make it while eggplants are in season and more affordable, it’s also a really economical dinner option and makes great leftovers too!

Different recipes that you find online or in cookbooks will have slightly different methods for cutting and cooking the eggplant. Some cooks like to roast or fry the eggplant in slices, but I like it cubed and fried in olive oil, until it just starts to colour.

Then onion, fresh oregano and (lots of) garlic are added. Fresh chilli or red pepper flakes would be good too if you like some heat. Sometimes, I add fresh cherry tomatoes. I also love adding a large spoonful of tomato paste to bolster the flavour and help to thicken the sauce.

Eggplant Pasta

The secret ingredient is actually vinegar. I don’t often have red wine on hand for cooking, but often substitue balsamic or red wine vinegar. It adds a great depth of flavour and helps to balance the acidity. I like to keep a stash of vinegars on hand of varying qualities and price points. I use a cheaper supermarket brand of balsamic for cooking and a better quality one that I love the taste of for dressing salads and cooked vegetables. 

You can, of course, use any shape and size pasta that you like with this one. I have used a rigatoni shape here because the sauce clings to it beautifully. Any kind of penne, spaghetti, spiral or casarecce will work well, so just go with your heart on this one.

Fresh herbs add so much to this Eggplant Pasta. Tomato, eggplant and basil are the best of friends in recipes. But in the past (pre herb garden days) I’ve used parsley or mint if I don’t have any basil.

Traditional recipes often call for ricotta salata, which is a dried, salted ricotta cheese that can be grated overtop. It is really not easy to find here in Sydney, so we can improvise. Sometimes I like to tear apart baby bocconcini and stir them into the pasta and sauce. The heat starts to melt them, and it makes the sauce a little creamy. You could also stir in some creamy ricotta or feta at the last minute. If nothing else, a generous dusting of grated parmesan is also very delicious. Or skip the cheese entirely to keep it dairy free and vegan friendly!

Another thing I love about this recipe is that it refrigerates, freezes and reheats really well. I’ve been growing eggplant in the garden the last two summers, so this dish is even more special when using home-grown. Last year, I made a triple batch of this sauce to use up my beautiful homegrown eggplants and kept it in the freezer for another day. On a busy day, you can just heat the sauce in a saucepan over low heat, or even in the microwave. Then just cook up your pasta of choice and voila, dinner in 10 minutes flat. Also, PS – did you know eggplant flowers are a beautiful shade of lilac purple? *heart eyes*

Eggplant Pasta

I hope that this Eggplant Pasta recipe becomes part of your repertoire. Maybe it will even turn into one of your favourites like it is for me! As quick and easy as it is for a weeknight, you could also serve it for a casual dinner with friends. I would serve this in a large dish in the centre of the table – banquet style – scattered with more fresh basil. Along with some lovely crusty bread and a nice glass of wine, you’ve got yourself a good time! 

If you make this Eggplant Pasta recipe, please let me know here in the comments or over on Instagram. Please take a pic and tag me @spicyicecream. I absolutely love to see your photos of the recipes you’ve made!

Related Post: Easy Salami Pasta with Cherry Tomatoes & Burrata

Eggplant Pasta

Eggplant Pasta (Pasta alla Norma)

Eggplant Pasta, or Pasta alla Norma as it's sometimes known is a delicious, quick and simple dinner, perfect for weeknights. It's a vegetarian meal that can be easily adapted to be gluten free or vegan and great for beginner cooks!

Course Dinner, Main Course, Pasta
Keyword Pasta, Simple Dinners, Vegetarian
Prep Time 10 minutes
Cook Time 30 minutes
Servings 4

Ingredients

  • 1 large eggplant, cut into 2cm cubes
  • 1/2 brown onion, finely chopped
  • 3 cloves garlic, finely diced
  • 1 teaspoon fresh oregano, finely chopped (or 1/2 teaspoon dried oregano)
  • 3 tablespoons olive oil
  • 250 g cherry tomatoes, halved
  • 1/4 cup red wine or balsamic vinegar, or to taste
  • 1 x 400g can died tomatoes
  • 1 heaped tablespoon tomato paste
  • Salt and pepper, to taste
  • 1 teaspoon sugar, or to taste, optional
  • 500 g rigatoni or pasta of your choice
  • Large handful fresh basil, roughly chopped
  • Fresh parmesan, grated, to serve

Instructions

  1. Heat the olive oil in a large frypan or saucepan on medium heat until hot. Add the eggplant and cook, stirring occasionally for 7-10 minutes or until they start to colour. Add the chopped onion, garlic and oregano and cook, stirring for about 3 minutes. Add the cherry tomatoes and balsamic or red wine vinegar and cook for another 5 minutes or until the tomatoes start to burst and release their juice.
  2. Turn the heat down and add the can of tomatoes, tomato paste, salt and pepper and stir to combinme. Cook, stirring occasionally for 10-15 minutes or until the sauce is slightly thickened. Test for seasoning and add a little sugar or more vinegar if you like.
  3. In the meantime, cook your pasta in boiling, salted water until al dente. Reserve 1/2 cup of the cooking water.
  4. Remove the sauce from the heat and stir in the fresh basil. Drain the cooked pasta and add to the sauce, stirring to coat. Add some or all of the reserved cooking water if the sauce consistency looks too thick.
  5. Serve with more fresh basil and freshly grated parmesan cheese.

Best Recipes of 2021

Spicyicecream Best Recipes 2021

We are well into the twilight zone that is the week between Christmas and New Years. I’m not sure what day it is, and I’m pretty sure I’m not alone in wanting to leave this year far behind! 2021 included 20 client photoshoots and one interstate trip for my birthday, immediately followed by 108 days in lockdown. I’ve said it before but my gratitude journal got me through it, and whether I wrote down 3 things or 3 pages, a little bit of gratitude every day helped to improve my mood and put things into perspective. I kept the habit going after lockdown and now I’m at 189 days of consistent journalling every morning. My new goal is to make it to 365 days!

I am also proud that I published 20 blog posts, including some of my long-time favourite simple dinners. Over 2020/21, I fell in love with gardening and preserving. I really loved making recipes that used my home grown vegetables, fruit and herbs from my little backyard garden.

I also just want to say again, THANK YOU for stopping in here, reading my latest posts, trying out my recipes and saying hi on Instagram. I am truly so grateful. In 2022, this little food blog will turn 15. I honestly can’t believe that and I can honestly say that I still love coming here and sharing new recipes. It is my biggest goal to post more consistently here in this coming year! So on that note, here are my favourite recipes posted in 2021. If you have tried any of these, leave me a comment below!

Best of 2021 Salami Pasta Cherry Tomatoes

1. Easy Salami Pasta with Cherry Tomatoes and Burrata

This is one of our absolute favourite quick and easy dinner recipes that we make all the time. I can’t believe it took me this long to share it! The “sauce” comes together in less time than it takes to cook your pasta. I have also loved making this recipe with home grown cherry tomatoes and basil from the garden. We love to serve it with burrata or torn bocconcini and lots of fresh herbs and cracked pepper.

Best of 2021 Apple Miso Crumble

2. Apple Miso Crumble with No Churn Salted Caramel Ice Cream

Just before lockdown, my sister Beth and I had a spontaneous apple picking adventure, which was so much fun. We drove to Bilpin, which is about 40 minutes away and picked a few kilos apples, which I then obviously had to bake with. Apple Crumble is such a classic winter comfort dessert, but the addition of miso is absolutely delicious. The homemade (no churn) ice cream is also the perfect accompaniment.

Best of 2021 Creamy Calamansi Bars

3. Creamy Calamansi Bars

Another thing I am growing in the garden this year is Calamansi – a citrus fruit used in a lot of south-east Asian cuisine. They are so delicious – a little sweet, and it has this incredible floral citrus scent that I wish I could wear as a perfume. I used the zest and juice to make these Creamy Calamansi Bars that everyone just loved. They have a shortbread base and a creamy filling that was easy to make but ended up being one of my favourite recipes of the whole year.

Best of 2021 Fruit Mince Wreath

4. Fruit Mince Wreath

I recently turned my famous Fruit Mince into this festive Fruit Mince Wreath! Ohh this was a good one. It’s great to share – just cut into generous slices and serve with custard. It looks so impressive and makes such a lovely afternoon tea or dessert. However, I wouldn’t be opposed to serving this for a decadent Christmas Day breakfast either! 

Best of 2021 Chunky Chicken Risoni Soup

5. One Pot Chunky Chicken Risoni Soup

This one pot wonder is another one of our favourites – actually a recipe that I’ve been making for over 10 years! This recipe is halfway between a minestrone soup and a risotto. It is chunky, hearty and filling but still feels fresh with lots of vegetables that bring colour and texture. It is somehow perfect any time of year.

Best of 2021 Nectarine Chilli Chutney

6. Spiced Nectarine Chilli Chutney

I spent an hour researching the difference between chutney and jam while writing this post, and honestly I’m still not sure 😂 We are still enjoying this Spiced Nectarine Chilli Chutney on every single cheese board. I really really love this recipe! It’s perfect with a sharp cheddar and some fancy crackers. I love preserving summer fruits to use all throughout the year. This recipe also used home grown chillies and kaffir lime leaves! 

Best of 2021 Blueberry Loaf Cake

7. Blueberry Loaf Cake with Lemon and Thyme Glaze

This simple loaf cake is adorable and delightful. We really loved having big slices of this Blueberry Loaf Cake with a cup of French Earl Grey tea. It’s the perfect afternoon tea treat! The best part is when you get a little of everything in the one bite – the tender cake, a jammy blueberry and some of that delicious glaze too.

Best of 2021 Mulled Wine Cheesecake

8. Mulled Wine Cherry Cheesecake Bars

And finally, this recent recipe was one of my favourites this Christmas season. We absolutely loved these Cheesecake Bars, which felt festive and elegant. I’m so glad that I finally made it after this recipe sat on my “To Make” list for about 3 years! I loved everything about it, especially the fact that it’s completely No Bake and can be made in advance. Bookmark this one for next Christmas!

Wishing you a very Happy New Year and hoping 2022 is a little easier on us all. 

Spiced Stars and Snowflake Cookies

Spiced Stars and Snowflake Cookies

Cookies are to Christmas what chocolate is to Easter! I just love making Christmas cookies, from gingerbread men to crinkles, snickerdoodles to speculaas. Christmas cookies can come in all shapes and sizes – carefully cookie-cuttered or rustic. I don’t discriminate, I love them all. I am so impressed at all the amazing decorated cookies that I see on Instagram and Pinterest. Some people are so talented. Meanwhile, I’m over here keeping it very simple with these Spiced Stars and Snowflake Cookies. 

These cookies are so perfect for Christmas, sort of half way between a sugar cookie and gingerbread. There’s some subtle spices to make them feel festive, but feel free to add more if you like! I’ve used golden syrup here, but you could substitute honey or maple syrup to make a lighter cookie. If you want more of a traditional gingerbread, try using treacle or molasses. Either way, the dough comes together quickly and easily and can be made in advance and refrigerated until you’re ready to cut out and bake your cookies.

Spiced Stars and Snowflake Cookies

Here in Australia, we have a summer Christmas, so it’s often very hot when I’m trying to do my festive baking! How ironic that these cookies are snowflake shaped!! It’s important to keep the dough as cool as possible to create the best cut out shapes. If you need to chill your dough a few times between rolling it out then definitely do. It is much easier to work with and the cookies keep their shape better.

You can also put your cut out shapes on the baking trays in the fridge or freezer for a few minutes prior to baking. I also like to roll the dough out between two sheets of baking paper to prevent it from getting sticky and warm. I use an offset spatula, lightly floured to gently lift the cut out cookies onto the baking sheets, which again helps keep their shape perfect. As you can see, I’ve used star and snowflake shapes but you can do whatever shapes you like!

Spiced Stars and Snowflake Cookies

These Spiced Snowflake Cookies are so cute, and even though I’m not that great at piping and decorating, I think they still turned out really well. They would make lovely little gifts or addition to your cookie box. This is definitely something that you can get the kiddos involved with. You might end up with sugar all over the floor, but think of the memories!! I always loved making Christmas cookies with my Mum and Nanna.

The glaze is as simple as it gets – icing sugar and water. The trick here is to get the consistency right. You want it to be smooth and drizzly – not too thick or too liquid because either extreme will be difficult to pipe. If you need to thin out the glaze, add additional water 1/2 teaspoon at a time until you’re happy with it. Alternately, you can add extra icing sugar to thicken it up. The glaze will eventually dry hard but it can take a while. Be careful not to stack or pack away the cookies until the glaze is fully dried.
Spiced Stars and Snowflake Cookies

To decorate the cookies, I’ve used gold and white sanding sugar. It is a large granule sugar crystal that is great for decorating sweets because it won’t dissolve in the heat. I had never used this before but I love the classic, sparkly, wintery look that it gives these cookies. I found it in the baking aisle of the supermarket, next to all the sprinkles. If you can’t find it, use your favourite festive sprinkles, edible glitter or shimmer powder! At first I tried dipping the whole cookie into the sanding sugar, but I found that generously sprinkling it looked nicer.

And lastly, if you make these Spiced Stars and Snowflake Cookies or any of my other Christmas recipes, please let me know here in the comments or over on Instagram. Please take a pic and tag me @spicyicecream. I absolutely love to see your photos of the recipes you’ve made!

Related Post: Chocolate Spice Gingerbread

Spiced Stars and Snowflake Cookies

Spiced Stars and Snowflake Cookies

These Spiced Snowflake Cookies are so cute and would make lovely little homemade gifts or addition to your festive cookie box. The cookies are lightly spiced, halfway between a sugar cookie and gingerbread and are really fun to decorate.

Course Cookies
Keyword Christmas, Cookies
Prep Time 1 hour 30 minutes
Cook Time 30 minutes
Chill the Dough 1 hour
Total Time 3 hours
Servings 30 -40 cookies

Ingredients

  • 125 g butter, softened
  • 1/2 cup caster sugar
  • 1 egg yolk
  • 2 tablespoons maple syrup or golden syrup
  • 1 1/2 cups plain flour
  • 1 1/2 teaspoons cinnamon
  • 1 teaspoon vanilla bean paste or extract
  • 1 1/2 teaspoons ground ginger
  • 1/4 teaspoon ground nutmeg

Glaze

  • 2 cups icing sugar sifted
  • 2 1/2 tablespoons water
  • Sanding sugar

Instructions

  1. Place the butter and sugar in the bowl of an electric mixer and beat until pale and creamy, about 10 minutes. Add the egg yolk and beat to combine. Add maple/golden syrup, flour, cinnamon, vanilla, ginger and nutmeg and beat until well combined.
  2. Divide the mixture into two, wrap in plastic wrap and refrigerate for 1 hour.
  3. Preheat the oven to 180°C (350°F). Line two baking trays with non-stick baking paper.
  4. Roll the dough between two sheets of non-stick baking paper, to about 3mm thickness. Use snowflake and star cookie cutters to cut shapes out of the dough. Re-roll and repeat until all dough is used.
  5. Use a lightly floured offset spatula to carefully transfer the cookies to the baking paper lined trays. If it’s very hot when you are baking, you might want to refrigerate the cut out cookies for 15 minutes prior to baking.
  6. Bake for 7-8 minutes or until golden. Cool completely on the trays.
  7. To make the glaze, place sifted icing sugar and water in a bowl and stir until well combined. Adjust the consistency to your liking by adding a little extra water 1/2 teaspoon at a time. Transfer the glaze to a piping bag fitted with a small round tip. Pipe the glaze onto the cookies, staring with the outline shape and fill in the center. Use a toothpick to smooth out the glaze. Quickly sprinkle the sanding sugar onto the cookies. I did this one by one, piping the glaze and then sprinkling the sugar immediately.
  8. Allow the glaze to fully dry before stacking or packing away the cookies. Cookies will keep in an air-tight container for 3 days.

Recipe Notes

Makes 30-40 cookies

Recipe adapted from Donna Hay magazine

Fruit Mince Wreath

Fruit Mince Wreath

I used to have very strong opinions about fruit mince pies – I hated them! But a couple of years ago I cracked the code on fruit mince and turned them into something that I loved. Making several batches of fruit mince pies every Christmas has now become a tradition. I love giving them as homemade Christmas gifts, packaged in a little cellophane bag with a pretty ribbon. My family, friends and neighbours go nuts for them. This year I will of course be making them, but I wanted to try something different too. 

Enter this Fruit Mince Wreath that is as delicious as it is pretty. It’s like a fruit mince pie and a cinnamon roll had a baby. It’s perfect to share – just cut into generous slices. It makes such a lovely afternoon tea or dessert, either on its own or with custard. However, I wouldn’t be opposed to serving this for a decadent Christmas Day breakfast either! 

Fruit Mince Wreath

The fruit mince mixture is easy to make, just some stirring, chopping and grating involved. I really think using freshly grated ginger and lemon or orange rind instead of packaged mixed peel makes a huge difference. The flavours in your fruit mince will be the most delicious if you make it the day before and allow it to sit overnight. The fruit will get plump and infused with the flavours of spices and rum. However if you don’t have time for that, just give it an hour or so. And of course, feel free to add your favourite dried fruits – swap out peaches for the apricots or figs for the dates, or use a mixture. The recipe is very forgiving, so make it your own!

Fruit Mince Wreath
Fruit Mince Wreath

As for the dough, it couldn’t be simpler to make. It doesn’t require a mixer and has barely any kneading! It’s the perfect recipe to try if you’re a bit nervous around yeasted dough or want to make it with the kiddos. The dough is easy to roll out, shape and work with too, which is great for a recipe like this. It bakes up beautifully too, soft and perfect and smells soooo good in the oven.

To shape the dough into the wreath, roll it out into a large rectangle and then roll it tightly as if you’re making a cinnamon roll. Instead of slicing into little discs, we are carefully slicing the roll lengthwise, leaving a little space at the top. Then twist the two long pieces together and shape them into a circle, exposing some of the delish fruit mince filling in the process. If you have an extra person around the house, it might be good to enlist their help with the rolling and shaping step! It just seems way easier with an extra set of hands.

Fruit Mince Wreath

The wreath shape is so fun and festive. I love how it looks when baked, with a decorative ribbon tied in a bow at the top. A dusting of icing sugar completes the pretty picture. I thought about making a glaze but it’s perfect as it is. Of course – feel free to make rolls if the wreath is too overwhelming. They will still be beautiful, delicious and single-serve. I would definitely recommend serving this still warm and fresh from the oven, although it does reheat quite nicely too. 

And lastly, if you make this Fruit Mince Wreath or any of my other Christmas recipes, please let me know here in the comments or over on Instagram. Please take a pic and tag me @spicyicecream. I absolutely love to see your photos of the recipes you’ve made!

Related Post: No Churn Christmas Pudding Bombe Alaska

Fruit Mince Wreath

Fruit Mince Wreath

This Fruit Mince Wreath is as delicious as it is pretty. It’s like a fruit mince pie and a cinnamon roll had a baby. It’s perfect to share, cut into generous slices. It makes such a lovely afternoon tea or dessert, either on its own or with custard. However, I wouldn’t be opposed to serving this for a decadent Christmas Day breakfast either! 

Course Breakfast, Dessert
Keyword Bread & Yeast, Breakfast, Christmas, Dessert
Prep Time 1 hour
Cook Time 55 minutes
Rising Time 2 hours 30 minutes
Total Time 4 hours 25 minutes
Servings 8 servings

Ingredients

Fruit Mince

  • 200 g sultanas
  • 100 g dried cranberries
  • 80 g dates, de-seeded and chopped
  • 80 g dried apricots or peaches, finely chopped
  • 150 g brown sugar
  • 1 apple, grated
  • 1 teaspoon cinnamon
  • 1/4 teaspoon ground nutmeg
  • 1/4 teaspoon Chinese five spice or mixed spice
  • 1/2 teaspoon vanilla bean paste (or 1 teaspoon vanilla extract)
  • 1 teaspoon fresh ginger, finely grated
  • 1 teaspoon lemon zest, finely grated
  • 50 g butter, melted
  • 30 ml spiced rum (optional – use black tea if you prefer no alcohol)

Dough

  • 1 cup milk, warmed
  • 1/4 cup vegetable oil
  • 1/2 cup caster sugar
  • 7 g dried yeast (1 packet)
  • 3 cups plain flour
  • 1/4 teaspoon baking soda
  • 1/4 teaspoon baking powder
  • 60 g butter, melted
  • Demerara or raw sugar, to sprinkle
  • Icing sugar, to serve

Instructions

  1. To make the fruit mince filling mixture, place all ingredients into a bowl and mix well to fully combine. Set aside for at least 30 minutes to infuse. I love to make it the day before. You can make this days ahead and keep covered in the fridge if you like!

  2. To make the dough, place the warmed milk, oil and sugar into a bowl. Sprinkle over the yeast and 1 cup of flour. Fold in carefully, cover and set aside in a warm place for 1 hour.

  3. Add the remaining flour, plus baking soda and baking powder to the yeast mixture. Roll out the dough on a large piece of greaseproof paper to form a 25cm x 45cm rectangle.

  4. Brush dough with half the melted butter, and sprinkle evenly with the fruit mince. Roll to enclose. 

  5. With a small, sharp knife, cut the roll down the middle lengthwise, leaving a 3-4cm gap at the very top. On a hot day, you may need to refrigerated the log for 15 minutes before cutting it. Turn the two halves cut side out and carefully twist them together and form into a wreath/circle, pressing the two halves together to join them. It can be really helpful to have someone help you with this step!

  6. Transfer the wreath on the baking paper to a baking tray. Allow to rise, lightly draped with a clean tea towel or plastic wrap for a further 20-30 minutes. 

  7. Preheat the oven to 180°C (350°F).

  8. Brush the wreath with the remaining butter and sprinkle with a little raw or demerara sugar. Bake for 45-55 minutes, rotating at the halfway point. I also chose to insert a small metal ramekin into the centre of the wreath about halfway through baking to ensure that the middle ‘hole’ remained intact and the dough didn’t spread too much into the center. When it’s fully cooked, it should be golden and sound ‘hollow’ when tapped. 

  9. Transfer to a wire rack to cool slightly. Serve warm, dusted with icing sugar and custard (optional but highly recommended!). This Fruit Mince Wreath is best served on the day it’s made but can be stored in an air-tight container and reheated in the oven or microwave the next day.

Soy and Calamansi Glazed Ham

Soy and Camalansi Glazed Ham

This Soy and Calamansi Glazed Ham would be the most perfect centrepiece for Christmas lunch this year. The glaze is made with Asian-inspired flavours and glistens over the ham. Think fresh kaffir lime leaves, ginger, star anise, ginger and soy with the lovely flavour of calamansi. This recipe is absolutely phenomenal and I can vouch that it’s a total crowd pleaser! 

Until last year, the very thought of cooking a ham at Christmas lunch was so intimidating and overwhelming to me. I’m usually the one who comfortably brings dessert! But last year, I got it in my head that I wanted to try making a ham. I looked through ten years of hoarded Donna Hay magazines to find a recipe. I brainstormed ingredients that sounded appealing – brown sugar, golden syrup, pineapple, marmalade, ginger beer. 

I’m usually not one to measure out ingredients when I make savoury dishes, so I’m very glad I had the foresight to write down my glaze recipe. I kept that scrappy piece of paper for a whole year and cooked it again recently. Just confirming – yep, it’s still amazing. I just knew that I had to share the recipe for my Soy and Calamansi Glazed Ham here on the blog this year.

Soy and Camalansi Glazed Ham

I’ve talked about Calamansi before – the delicious citrus fruit that is widely used in Filipino and South-East Asian cuisine. I’m lucky enough to have a calamansi tree in the backyard, but you can buy calamansi juice or concentrate from some Asian grocery stores. If you can’t find it, I’d say a combination of orange and lime juice will give you a similar flavour. I also used a Calamansi-infused soy sauce to really pump up the flavour. If you can’t find it, just use regular soy sauce or tamari. 

Making the Soy and Calamansi Glaze

The glaze honestly couldn’t be simpler to make! All the ingredients just go into a saucepan and simmer away until they thicken up. You can also make the glaze up to 3 days before you want to serve your ham and store it in the fridge. This is a nice little time management hack to get ahead of your Christmas cooking prep!

The sweetness in the glaze comes from the brown sugar, which caramelises as it cooks. I’ve used whole star anise, cinnamon sticks, fresh grated ginger and Chinese five spice. I also love using fresh kaffir lime leaves – they smell so good and impart such a lovely flavour.

The other ingredients are rice wine vinegar, the calamansi juice and soy, plus a touch of spiced rum, because why not! I didn’t add any salt and pepper because between the saltiness of the ham and the soy sauce, the flavour was spot on and the Chinese five spice contains pepper anyway! Also, feel free to try this glaze on other kinds of meat, and even tofu or pumpkin!

Soy and Camalansi Glazed Ham

Preparing your Ham

Before you glaze and cook your ham, there’s a little prep work that must be done. Firstly, you need to trim off the rind, but KEEP the layer of fat underneath. To do this, cut a line or criss-cross at the shank/small end of the ham and then carefully slip a small sharp knife between the rind and fat to gently remove it. If you anticipate having a lot of leftovers, you can keep the rind and place this over the remaining ham to store it.

Once the rind is removed, carefully score the fat down to the meat layer, in a diamond pattern, following the shape of the ham. As it cooks, this creates lots of nooks and crannies for the glaze to accumulate and add flavour. Plus the fat becomes crisp and absolutely delicious. Many recipes say to decorate the ham with whole cloves but I have used Chinese five spice in my glaze, which gives a ton of flavour without having to pick the cloves out or accidentally crunch down on one later on. 

Soy and Camalansi Glazed Ham

Cooking your Ham

I used a small picnic ham, which comes from the front leg/shoulder, weighing about 3kg. Depending on how many people you’re catering for, you may need a much larger leg ham, which can be between 5-8kg. Of course the cooking time will vary depending on the size you get. A bone-in ham will have the best flavour. I baked mine for about 60 minutes, and basted with extra glaze every 20 minutes or so until it was heated through and golden brown. The more glaze the better, and do make sure you’re getting it into all those criss-cross diamonds.

I served the ham with a couple of delicious side dishes. I roasted some homegrown carrots with a little maple syrup and blanched broccolini with a little crispy chorizo scattered over top. And of course there was a huge pan of creamy, cheesy potato gratin.

The leftover ham also makes the most epic sandwiches ever, especially with a homemade chutney. I guess making the ham is my Christmas contribution from here on in and I don’t mind at all. Turning this into a life lesson – sometimes the things you anticipate to be intimidating turn out even more incredible than you thought. 

And lastly, if you make this Soy and Calamansi Glazed Ham or any of my other Christmas recipes, please let me know here in the comments or over on Instagram. Please take a pic and tag me @spicyicecream. I absolutely love to see your photos of the recipes you’ve made!

Soy and Camalansi Glazed Ham

Soy and Camalansi Glazed Ham

This Soy and Calamansi Glazed Ham is the perfect centrepiece for Christmas lunch or dinner. The Asian-inspired glaze is absolutely delicious and this dish is perfect to feed a large crowd!

Course Dinner
Keyword Christmas, Simple Dinners
Prep Time 1 hour
Cook Time 1 hour 30 minutes
Servings 8

Ingredients

  • 1 Picnic or Leg Ham (3-5kg)
  • 1 cup brown sugar
  • 8 kaffir lime leaves, roughly chopped
  • 1/3 cup calamansi juice or concentrate
  • 1/3 cup calamansi soy sauce
  • 1/4 cup rice wine vinegar
  • 1/2 teaspoon Chinese five spice
  • 4 star anise
  • 1-2 cinnamon sticks or 1/2 teaspoon ground cinnamon
  • 1 tablespoon freshly grated ginger
  • 1/4 cup spiced rum

Instructions

  1. To make the glaze, place brown sugar, kaffir lime leaves, calamansi juice, calamansi soy sauce, rice wine vinegar, Chinese five spice, star anise, cinnamon and ginger into a medium saucepan. Bring to the boil and then reduce the heat to low and simmer for 20-30 minutes or until starting to thicken. Add the spiced rum and stir to combine. Cook for a further 5-10 minutes. You can make the glaze up to 3 days in advance and store in the fridge.
  2. To prepare your ham, first remove all packaging. First you will need to remove the layer of rind, leaving behind the fat underneath. Cut a line or criss cross at the shank or small end of the ham and then carefully slip a small, sharp knife under the rind to loosen it from the fat. As mentioned above, if you anticipate having leftovers, you can keep the rind and cover the remaining ham with it for storage in the fridge.
  3. When the rind is completely removed, use your knife to score all the way through the fat layer in a 2.5cm (1 inch) diamond pattern, following the curve/shape of the ham.
  4. Preheat your oven to 160°C (320°F). Line a baking tray with aluminium foil.
  5. Transfer the ham to the baking tray. If you have stored your glaze in the fridge, bring it back to just before boiling point. Using a pastry brush, glaze the ham all over generously. Place into the oven for 20 minutes.
  6. Remove from the oven and glaze again every 20 minutes, rotating the baking tray so it cooks evenly. My 3kg ham took about an hour. Please refer to the cooking time suggested on the packaging of your ham. If your ham is colouring too quickly, you can cover it with some foil to prevent the glaze from burning.
  7. To serve, I like to remove the cooked kaffir lime leaves (optional) and wrap the shank end in some baking paper and add some fresh herbs tied with twine for aesthetic reasons. To carve, pierce the ham with a carving fork and use a carving knife or serrated knife to carve slices, following the grain of the meat. Serve warm or at room temperature.

Mulled Wine Cherry Cheesecake Bars

Mulled Wine Cherry Cheesecake Bars

Here we go! It’s finally December and I am torn between “OMG already?!” and “OMG finally!” after this crazy year. When we went into lockdown in June, it felt like we hit the pause button on life. Those months don’t really count, do they? But here we are, it’s Christmas again and I feel uncharacteristically festive. The first recipe that I’m sharing this Christmas season is these absolutely delicious Mulled Wine Cherry Cheesecake Bars. 

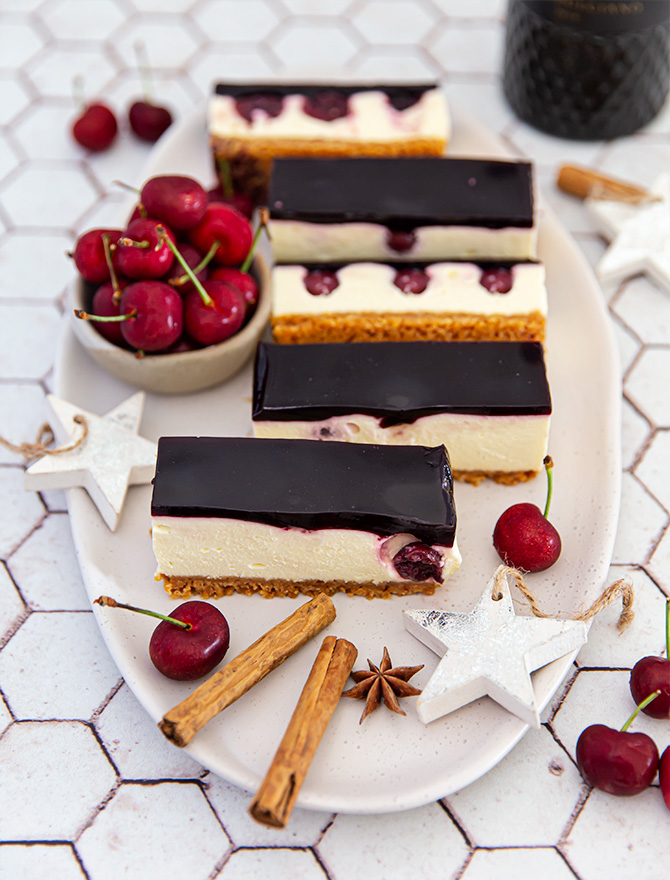
I have literally had this recipe in my head and on my blog ideas list for about three years. I’m happy to say that it turned out even better than I expected! I have made a few mulled wine desserts in the past such as doughnuts and marshmallows but this is my favourite yet. I loved each distinct layer of these Cheesecake Bars on their own, but when you get a taste of it all together it was sublime. The flavours were perfectly balanced – not too creamy, or rich, or sweet, but just right.

Mulled Wine Cherry Cheesecake Bars

The other thing I loved is that this dessert requires no baking at all and can be made in advance. It’s perfect for our hot Aussie Christmas Day, where you’re more likely to want a slice of watermelon than a slice of pudding. Each component is pretty quick and easy to make on their own, but do require the previous one to be set before it’s added on top. Of course you don’t have to serve these as bars but I love the way it looks. You could make this in a round cake tin and serve it in slices. 

I honestly can’t rave enough about these Mulled Wine Cherry Cheesecake Bars! We all really, really loved this one. Even the non wine lovers were big fans! It feels so special and festive to me – the perfect dessert to end off Christmas lunch. I think it looks beautiful with the three distinct layers and the pops of cherry all throughout.

Let’s run through each layer of these Cheesecake Bars…

  • Biscuit Base: The base is crushed Ginger Nut cookies and melted butter – super easy, nothing fancy here. But they really are the most perfect cookie crumb base for the flavours in this dessert. If you want to use any other kind of cookie as the base, I’d recommend adding in a little bit of ground ginger to get a similar flavour. 
  • Cheesecake: The middle layer is a no-bake cheesecake. I actually think this is one of the most perfect cheesecakes I’ve ever made. It’s creamy of course, but quite light and not too rich or heavy, with a little gelatine added to help it set. And a LOT of vanilla because it just tastes good. It slices up perfectly and keeps its shape, which very is important when you make a bar shape. I just know that I’ll be making this over and over in endless variations in the future. 
Mulled Wine Cherry Cheesecake Bars
  • Mulled Wine Cherries: Dotted into the cheesecake layer, we have some wine stewed cherries. I absolutely love cherry desserts at this time of year. They always feel so festive to me and I’m forever grateful that our Australian Christmas happens during summer and right in the middle of stone fruit season. However, if cherries aren’t in season where you live, these Cheesecake Bars would still be delicious without them, or you could try it with canned or frozen cherries. Or even a little bit of cherry jam swirled through the cheesecake layer would be so lovely.
  • Mulled Red Wine Jelly: My favourite part. I cooked down an entire bottle of wine with a little sugar and some warming spices like cinnamon, star anise, cloves, ginger and vanilla. It made the whole house smell delicious. The cherries take on the spiced red wine flavour they’re cooked in, and the juice they release adds sweetness as well.
Mulled Wine Cherry Cheesecake Bars

My sister has been learning all about wine from New South Wales and picked an amazing option for this dessert. We used a Bélena Montepulciano from Calabria Family Wines in the Riverina region. With flavour notes such as cherries, boysenberries and plum, it was an absolutely perfect choice for this dessert. Plus, the bottle is stunning and just begged to be photographed too. The jelly layer might taste slightly different depending on the wine you use. I would recommend picking something that has similar dark fruit notes and a little spice, or a decent quality red wine that you love the taste of.

And lastly, if you make these Mulled Wine Cherry Cheesecake Bars or any of my other Christmas recipes, please let me know here in the comments or over on Instagram. Please take a pic and tag me @spicyicecream. I absolutely love to see your photos of the recipes you’ve made!

Related Post: Roasted Cherry (No Churn) Ice Cream Sandwiches

Mulled Wine Cherry Cheesecake Bars

Mulled Wine Cherry Cheesecake Bars

These Mulled Wine Cherry Cheesecake Bars are a delicious, sophisticated and festive dessert for this Christmas season. Each component is absolutely delicious but when you taste them all together, the result is sublime! Plus, it’s no bake and can be made ahead of time!

Course Dessert
Keyword Cheesecake, Christmas, Dessert
Prep Time 1 hour
Cook Time 40 minutes
Chill in Fridge 10 hours 30 minutes
Servings 10

Ingredients

Biscuit Base Layer

  • 250 g ginger nut biscuits
  • 90 g butter, melted

Mulled Wine Cherries and Jelly

  • 350 g cherries, pitted
  • 750 ml red wine
  • 6 cloves
  • Rind of 1 lemon or orange
  • 1/2 cup caster sugar
  • 2 cinnamon sticks
  • 1/2 vanilla bean, seeds scraped or 1 tablespoon vanilla extract
  • 3 cm piece of ginger, thinly sliced
  • 2 teaspoons gelatine
  • 1/8 cup water

Cheesecake Layer

  • 3 teaspoons gelatine
  • 1/4 cup water
  • 500 g cream cheese, softened
  • 2/3 cup caster sugar
  • 1 tablespoon vanilla extract or vanilla bean paste
  • 300 ml cream
  • 1 tablespoon maple syrup

Instructions

  1. Prepare a 19cm square cake tin by lining the base and sides with baking paper.
  2. To make the biscuit base layer, add the ginger nut biscuits to a food processor and process until fine. Add the melted butter and pulse a few times until fully combined. Press the biscuits into the base of the cake tin and smooth with the back of a spoon. Chill in the fridge for about 30 minutes before adding the next layer.
  3. In the meantime, make the mulled wine cherries. Place the red wine, cherries, sugar, cinnamon stick, cloves, orange/lemon rind, vanilla and ginger into a saucepan and heat over low heat until it just comes to a boil. Simmer on a very low heat uncovered for around 30 minutes. Remove the cherries and continue to cook mulled wine for another 10 minutes. At this point you can allow to infuse for up to an hour if you’d like a stronger taste.
  4. To make the cheesecake filling, beat the cream cheese and sugar with an electric mixer until smooth. Scrape down the sides of the bowl and add the vanilla, cream, maple syrup. Whisk until light and fluffy.

  5. Sprinkle 3 teaspoons of gelatine over the 1/4 cup of water in a small bowl. Stand this bowl in a larger bowl filled with hot water or over a small saucepan. Whisk until the gelatine is completely dissolved. Stir in the gelatine mixture to the cheesecake mixture until fully combined. Pour the filling over top of the biscuit base in the pan. Add the stewed cherries, pressing them into the mixture until mostly submerged and refrigerate for at least 2 hours.

  6. Strain out the spices from the mulled wine mixture. Put back onto the heat until just coming to a boil. Allow to cool slightly.
  7. Sprinkle the 2 teaspoons of gelatine over 1/8 cup water and whisk to dissolve in the same way as above, over hot/simmering water. When dissolved, whisk into the wine mixture until fully dissolved. Optionally, you can strain this mixture again through a piece of muslin into a heatproof jug. Pour the mulled wine mixture over top of the fully set cheesecake layer and place back into the fridge to chill overnight.
  8. When ready to serve, cut slices with a hot knife and wipe down the knife between each cut. You can cut into 10 larger bars or cut each in half again for a “bite size” cheesecake bar. Serve immediately.

6 Homemade Additions to Elevate Your Next Cheese Board

Homemade Cheese Board

Today we’re talking #cheeseboardgoals. This is something I take very seriously! Now that we can have friends over again (yay!) the cheese board is one of my go to things to serve. A beautiful cheese board is perfect for large holiday parties or small girls nights and it’s so much easier and more versatile to cater for than an elaborate plated meal. Plus they just look so inviting with many different colours and textures.

They can also be as easy and budget friendly or elaborate and fancy as you like! In fact, most supermarkets now stock a fantastic selection of cheeses, along with quality charcuterie sliced to order, fancy olives and antipasto ingredients.

At it’s most simple, the cheese board requires no cooking – just some artful arrangement of your favourite cheeses, deli meats such as salami or prosciutto, crackers and accompaniments. You can add nuts, fresh or dried fruit, olives, cut up vegetables, pickles and chutneys – whatever you like best! I’m not here to tell you how to make a cheese board today. My best advice is to go with what YOU like… and if you need some inspiration for how to make it look amazing, go check out Pinterest or Instagram!

What I do what to talk about is elevating your cheese board with some homemade elements too. I love to have a mix of store bought and homemade additions. This is a way to make it uniquely yours with touches that you can’t just go and buy at the supermarket.

Six recipes to take your cheese board to the next level…

Homemade Cheese Board

1. Homemade Seeded Crackers

For me, the most important thing on your cheese board, after the cheese itself is the crackers. They are your vehicle for eating all of that delicious cheese! While I do love a fancy cracker on occasion, I also love making my own when I have more time. This recipe is incredibly easy to make – all your need is four ingredients and a rolling pin! I love to experiment with the toppings too, from sesame and fennel seeds to fresh rosemary. They look rustic and homemade but that’s the best part because hey, you made them!!

Homemade Cheese Board

2. Crumbed Feta with Roasted Grapes and Honey

Now this is one way to take your cheeseboard game to a whole other level! This is a fantastic vegetarian appetiser and a total crowd pleaser! I mean, it’s fried cheese after all – how can you go wrong? The grapes and honey add sweetness that offsets the salty crumbed feta beautifully. The fresh thyme and oregano add a pop of contrasting colour and lovely flavour. It’s a lovely mix of flavours and textures, served with crusty bread.

Homemade Cheese Board

3. Spiced Nectarine Chilli Chutney

I absolutely love this chutney that straddles the line between sweet, savoury and spicy perfectly. Trust me when I say you need to make this one. We are still making our way through the jar of this that I made and it’s so delicious with cheese, especially with a sharp, crumbly cheddar. This recipe is also the perfect introduction if you’re new to making chutney because it’s very simple to make. You can make this chutney well ahead of time and stored for up to a few months in the fridge.

Homemade Cheese Board

4. My Favourite Zucchini Pickles

I love serving pickles on a charcuterie board. While gherkins are the most common choice, I love these homemade zucchini pickles just as much. They are also super versatile and I promise you will love them on burgers and toasties just as much as your cheese board.

Homemade Cheese Board

5. Beetroot Hummus

I always have the ingredients on hand to make a quick batch of basic hummus but there are countless ways to dress up this delicious dip and make it a showstopper. You could add herbs, chilli, roasted pumpkin or sweet potato. Or try this recipe for Homemade Beetroot Hummus. This is so easy to put together in a food processor and tastes much better than store bought.

Homemade Cheese Board

6. Homemade Tomato and Chilli Jam

Now this has become one of the most popular recipes on my site and for good reason! It’s sort of become my signature and I love making it to give to friends as edible home-made gifts. I always make sure to have a batch of Tomato and Chilli Jam in the fridge at all times – it’s our favourite! It is so delicious with cheese and great to have on hand at all times. Perfect for a last minute cheese board if we have guests, or even an impromptu Friday night lockdown cheese board and Scrabble game!

I hope this post has given you some ideas for little homemade touches that will elevate your next cheese board. I honestly think I will be constantly updating this post for years to come as I come up with even more recipes that go great with cheese! If you try any of these, please tag me @spicyicecream on Instagram because I always love to see the recipes you guys make. And I truly hope that you all enjoy the upcoming festive season with all of your family and friends!

Watermelon Paloma

Spicy Watermelon Paloma

It’s crazy to think that before a few short years ago, I had baaaad tequila memories. But these days it’s one of my favourite spirits, and I truly feel like I’m making up for lost time. Last year I got really into margaritas, but this year I am into another tequila-based drink. Summer of Palomas, anyone? Yup, I think it will be as fun as it sounds. 

If you’ve never had a Paloma before, it’s a tequila cocktail that originated in Mexico. Like a margarita, it has tequila and lime juice but is generally less sweet and has grapefruit juice or soda, so it has a little sparkling fizz. It’s also simply stirred or shaken together and not served blended or frozen. Translation – it’s one of the easiest and quickest drinks to make! While the traditional Paloma is awesome, of course there are variations galore. And you just know that I love putting a little spin on a classic recipe.

Spicy Watermelon Paloma

This Watermelon Paloma is such a great summer drink – refreshing with a touch of bitterness and a little heat. It’s got sweetness from the watermelon balanced out with the bitterness of the Aperol. The citrus brings a little sour and of course it’s topped off with a chilli salt rim. The way that it turns on all your taste buds at once and hits all those different taste receptors is so fun. I think it brings your whole palate to life. 

This recipe is actually my recreation of a delicious drink that I had at my birthday dinner 500 years ago back in June, before lockdown. We went to Light Years on the Gold Coast and as usual it was a 10/10 experience. But months later I was still thinking about the cocktail I had – the Lola Paloma – so I decided to try and make it at home. I’m so happy with how it turned out!

Spicy Watermelon Paloma

To make this Spicy Watermelon Paloma, here’s what you’ll need…

  • Blanco or Silver tequila – This is a clear coloured tequila that is not aged like a Reposado or Anejo, which are classified by how long they have been aged. Blanco or Silver tequila often has fruitier notes which makes it great for margaritas and other citrus forward drinks. If you like it spicy you can create your own chilli infused tequila. Just take a bottle of good tequila, 1-2 (or more) chillies cut down the middle, and infuse for 24-48 hours. Strain them out and use in cocktails. I’ve often seen jalapeños used, but you could try your favourite kind of chillies. Experiment with the number of chillies and time of infusion to your liking.
  • Aperol – The original drink used Campari, but I used Aperol because it’s what I had on hand. Aperol is an aperitif like Campari, but it is slightly less bitter and has a lower alcohol content. I also feel like the rhubarb and bitter orange in Aperol complement the watermelon and grapefruit really well. 
  • Watermelon juice – I used about 350g of fresh watermelon, blitzed it in the Nutribullet and strained it to make 2 cocktails. Boom, now you have the freshest watermelon juice!
  • Grapefruit juice – Many Paloma recipes use grapefruit soda but I love using freshly squeezed ruby grapefruit juice.
  • Fresh lime juice – Of course.
  • Dash of soda, lemonade or ginger beer – for a bit of fizz.
  • Chilli salt – for the rim. I skipped the spicy tequila this time but in my opinion you absolutely have to have the chilli salt rim.
Spicy Watermelon Paloma

And because I’m a Gemini and I love a random fact… Ever wondered why palomas and margaritas are always served with a salted rim? Well there’s actually a scientific reason for that! The molecules present in salt (sodium ion) actually have the benefit of dampening bitter tastes, and can work to enhance the sweet and sour notes of the drink! 

Sharing this cocktail now is actually perfect timing, as watermelon season is just beginning for us here in the southern hemisphere. For the next few months, we’ll pretty much always have a watermelon in the fridge at all times, sliced up and ready to grab as a refreshing snack. Or, you know, to have on hand for a watermelon paloma! 

Related Post: Roasted Strawberry Paloma

Spicy Watermelon Paloma

Watermelon Paloma

This Watermelon Paloma is such a great summer drink. It's refreshing and fruity with a hint of bitterness from the Aperol and a little chilli kick!

Course Cocktails, Drinks
Keyword Cocktails, Drinks, Spring, Summer
Prep Time 10 minutes
Servings 2 drinks

Ingredients

  • Flaky salt and chilli flakes
  • 90 ml Silver or Blanco Tequila
  • 50 ml Aperol
  • 100 ml fresh ruby grapefruit juice
  • 100 ml fresh watermelon juice
  • 30 ml fresh lime juice
  • Dash of soda or ginger beer
  • Ice cubes, plus extra to serve
  • Extra watermelon, for garnish

Instructions

  1. Pour a generous amount of flaky salt and chilli flakes onto a small plate and stir to combine. Line the rims of two glasses with lime juice and gently dip the rims into the salt/chilli mixture.
  2. Combine the silver tequila, Aperol, grapefruit juice, watermelon juice and lime juice in a cocktail shaker. Add ice and shake vigorously for 10 seconds.
  3. Add extra ice to your serving glasses and using a strainer, pour the cocktail evenly between the glasses. Top up with a dash of soda or ginger beer and garnish with a thin slice of watermelon.

Veal and Chorizo Sausage Roll

Veal and Chorizo Sausage Rolls

A long time ago, in (what feels like) a galaxy far, far away, I was a designer for a hospitality group in Sydney. My favourite venue was Gazebo Wine Garden in Elizabeth Bay. I loved the vibe and almost everything on the menu was phenomenal. There were a few dishes that I have always wanted to try my hand at recreating, even now more than 10 years later. One of them is this Veal and Chorizo sausage roll. It was the perfect little snack to nibble while you caught up with your girlfriends over a glass of wine or a jug of fancy sangria in the wine garden… and Foxy the Fox perched on the ceiling (if you know, you know.)

It’s probably not Sydney’s most famous sausage roll – I think Bourke Street Bakery still holds that honour – but it was my personal favourite. And this is coming from a girl who spent her entire childhood iffy about sausage rolls. Until I tried these two elevated sausage rolls, I would always avoid them at birthday parties or bakeries. I never ordered from the school canteen and avoided them at football matches. As with most things in life, homemade is sooo much better than low-quality frozen supermarket versions!

Veal and Chorizo Sausage Rolls

So, what makes a great sausage roll?

  • The meat (obviously): Questionable sausage mince and low quality ingredients are a hard ‘no’ from me. But when you make your own sausage roll, you can use pure mince – beef, veal, pork, chicken, turkey or a combination of the above (veal and pork is awesome). You can even make a plant based meat-free or veggie version! You can also add other delicious additions flavour bombs like bacon or chorizo as I have. 
  • The flavourings: Here is where you can get really creative. You have a whole world of herbs, spices, pastes, sauces and more at your fingertips. I used some finely chopped onion that I cooked until caramelised and then cooled before adding to the mince. The mixture was also flavoured with thyme, garam masala, paprika, Worcestershire sauce and mustard. I love the flavours all together but feel free to experiment with your favourite flavours. Maybe fennel seeds, harissa paste or quince jam?

    Also, don’t forget to season generously with salt and pepper. And a little Tip: Take a teaspoon of the mixture and cook for a few minutes in a frypan. This allows you to test for flavour and seasoning before you roll them up to make sure you’re happy with the flavour!
Veal and Chorizo Sausage Rolls
  • The binding ingredients: My recipe uses an egg and some breadcrumbs to ensure that the mince mixture holds together well and isn’t crumbly inside the pastry casing. I’ve also seen recipes using cornflake crumbs or grated carrot, which could be delicious additions! Another tip: take your mince out of the fridge 15-30 minutes before you start, as cold meat will have a harder time binding together. And yes, you will need to get your hands dirty. Mixing with clean, wet hands is definitely the easiest way to combine all the filling ingredients!
  • The pastry: Puff pastry is the star here, giving you a golden, crispy and flaky exterior. This is not the time and place for any other kind of pastry! If you wanted to get really fancy, you could even make your own puff pastry! But honestly it’s very time consuming. Even though I love making things from scratch, I do keep frozen puff pastry on hand at all times. An all butter puff pastry will give you a more delicious result, but isn’t always available at my local supermarket.
  • The sauce: Tomato sauce or ketchup is usually the accompaniment of choice with a sausage roll. But I’m elevating that too and serving it with my delicious homemade Tomato and Chilli Jam. Honestly this combination is so good. The sweet and slightly spiced jam is the perfect match for a fancy sausage roll. You could also try a caramelised onion relish or a quality store-bought or homemade chutney too. 
Veal and Chorizo Sausage Rolls

I just loved how these Veal and Chorizo Sausage Rolls came out! They reminded me so much of the original Gazebo dish and all the memories that went with it. I love that they make a yummy lunch served with a salad, or you could cut them up into bite-size pieces to take to your next get together with friends. They are always a crowd pleaser, I promise.

The filling was so meaty and delicious and I loved the little bursts of smoky flavour that the chorizo gave. The tomato and chilli jam was the perfect sauce to serve alongside them. Honestly, this jam has become one of the most popular recipes ever in my 14 years of blogging! In fact I am almost out and will need to make another batch very soon! As always, I love a versatile recipe so feel free to adapt it to your liking and add different spices and flavourings!

Related Post: Ottolenghi’s Herb Pie

Veal and Chorizo Sausage Rolls
5 from 1 vote
Print

Veal and Chorizo Sausage Roll

This Veal and Chorizo Sausage Roll is a delicious lunch or finger food for your next party. It's easy to make and so much more delicious than store-bought!

Course Dinner, lunch, Snack
Keyword Australian, Pies & Tarts, Simple Dinners, Snack
Prep Time 40 minutes
Cook Time 30 minutes
Total Time 1 hour 10 minutes
Servings 20 bite-size sausage rolls

Ingredients

  • 500 g veal mince
  • 1-2 chorizo sausages, cut into 0.5cm squares
  • 1 tablespoon olive oil or butter
  • 1 onion, finely chopped
  • 1/2 teaspoon thyme, fresh or dried
  • 3/4 teaspoon garam masala
  • 1/2 teaspoon paprika
  • 1 1/4 teaspoons salt
  • 3/4 teaspoon white pepper
  • 2 tablespoons Worcestershire sauce
  • 1 tablespoon Dijon mustard
  • 1 egg, whisked
  • 1/2 cup breadcrumbs
  • 2 sheets puff pastry
  • 1 egg, extra, whisked
  • Sesame seeds or poppyseeds, to garnish
  • Homemade Tomato & Chilli Jam, to serve

Instructions

  1. Remove the mince and chorizo from the fridge about 30 minutes before you plan to make the filling mixture.
  2. Cook the onion on a low heat in 1 tablespoon of olive oil or butter until browned and then set aside to cool.
  3. Place the mince and diced chorizo into a large bowl. Add the cooled onion, thyme, garam masala, paprika, salt, pepper, Worcestershire sauce, mustard and egg. Mix to combine with clean, damp hands. When the mixture has come together, add in breadcrumbs and mix again until fully combined. Divide the mixture into 4.
  4. Cut each sheet of puff pastry in half and prepare 2 baking trays lined with non-stick baking paper. Preheat the oven to 180°C (350°F) if baking these straight away. Place a quarter of the veal and chorizo mixture onto the long side of the pastry and pat or roll into a sausage shape the length of the pastry. Roll to enclose and gently press the two sides of the pastry together. Place seam side down onto the baking tray. Repeat 3 more times to make 4 sausage rolls in total.
  5. You can store these, covered with plastic wrap in the fridge until you’re ready to bake. When ready, brush each sausage roll with some beaten egg and scatter with your choice of topping. I like sesame seeds and poppy seeds. You could also use fennel seeds or black sesame seeds.
  6. Bake for 30 minutes, or until the puff pastry is crispy and golden. Cut each sausage roll into 5 smaller rolls if desired and serve hot with homemade tomato and chilli jam.